
Epson Perfection V850 Pro the review - Profiling the scanner.
This is a short tutorial of how to use the application Xrite i1 Scanner to make a color profile for the Epson Perfection V850 pro.
A good scanner color profile is a smart way to get a scan that is more true to the colors of original. It also give you a better starting point for further editing and a short-cut to a good end result.

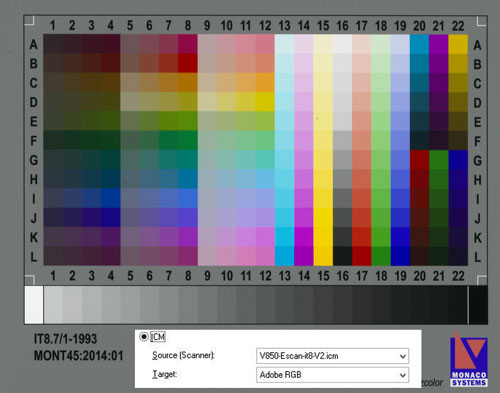
Typical IT8 Target to the left. This one
is from Monaco Systems but
several other brands can be used with
i1 Scanner like:
- Wolf Faust
- SilverFast
- Kodak
- Hutch Color
Step 1.In the i1 package you will find two it8 targets for scanner profiling. One of them is for reflective scanning and the other (which I have chosen) is a 4x5 positive film target.
Now it time to scan the target and I chose to use Epson scan for this. Make sure to turn off all adjustments and color management to be sure that the image get scanned "RAW".
Scan at the i1 Scanner suggested resolution and image format (300ppi uncompressed 16 or 24 bit TIFF for the 4x5 target) and save the scanned image of the target where you easily can find it ;-)
Note: I suggest that you do the RAW scan with the same scanning application that you intend to use for your future scans. If you want to use SilverFast scanner software (Also bundled with V850 Pro then use SilverFast to create the "RAW" target scan.
Xrite i1 Scanner is a bundled software that was delivered with the V850 Pro that is easy to use.

Step 2.
Open up i1 Scanner program and you will find this start screen now just click scanner profiling button and go to the next step.
Note: There is no reason to select Advanced, this version of i1 scanner for Epson only have Basic interface.

Step 3.
Time to select target type in the drop down i chose Xrite transparency 4x5 since that is the target I have chosen from the bundled package when you have chosen your target type click next >.
Note: The documentation was a bit cryptic here but I found out that Xrite target was the same thing as Monaco it8 target.

Step 4.
Now load the scanned "RAW" Tiff image either by simply dragging it to the field with the "square and avatar" or by clicking on Load Image... button and select the right file and click next >.

Step 5.
Click Load the reference file and you will get a view like the image below.

Step 6.
Chose the file that corresponds to the target, the yellow square on the target scan will give you a hint which file to chose, select and click open.
Note: The bundled software did not contain the reference file that was required for my target so I had to download an updated reference file.
Link to 4x5 Transparency Reference file 2007..2014 for PC
Link to 4x5 Transparency Reference file 2007..2014 for MAC
Link to reflective target reference file 2007..2014 for PC
Link to reflective target reference file 2007..2014 for MACXrite i1 Scanner page for Epson

Step 7.
Name your new profile with a descriptive name and chose which ICC profile version you would like to create and where to save it then hit the "Create and save profile" button.
IMPORTANT: If you intend to use the profile with Epson Scan chose "ICC Profile Version 2". This is due to the fact that Epson Scan will not work with Version 4.
The ICC Profile Version 4 does however work just fine with SilverFast and various image editors like Photoshop Gimp and probably many more.

Step 8.
In Windows (Have not tried this on MAC) Look up the ICC Profile file and right click it to select "Install Profile" and your profile will get installed to Windows Profile folder and become ready to use.

Step 9.
Image above shows the setting you need to do in Epson scan to embed the profile within the scanned image. click the button Configuration (you need to be in Professional mode) and you will reach the menu above in Epson scan.
 |
|
Epson V850 Pro built in Profile sRGB output not bad at all and i guess most users will use this setting and don't bother with custom profiles. |
|
 |
Custom built i1 Profile sRGB output. |
 |
|
 |
Same scan as the previous Adobe RGB but now converted to sRGB during JPG conversion. |


Some flower scans with different scanner ICC profiles;-) |
|
 |
The RAW scanned 35mm mounted slide to the left here scanned at 300ppi since this section is all about color. All except the RAW one have had some sharpening applied as follow. Amount = 400 |
 |
 |
| Epson Perfection V850 Pro standard film profile in EPSON Scan software | Epson Perfection V850 Pro standard film profile in EPSON Scan software plus restore color ticked |
 |
 |
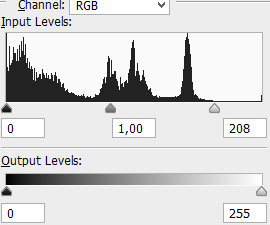
| Epson Perfection V850 Pro i1 Scanner-created profile used with EPSON Scan software | Epson Perfection V850 Pro and a profile created with i1 Scanner. Used with EPSON Scan software plus the levels adjusted in a image editor with setting as in the image below. |
I vote for the custom profile but thats me ;0) From now on I will use custom profiles on all further scans in my Epson Perfection V850 Pro review. |
 |
Books on the subject