
The D.I.Y high speed slide film "scanner" slidesnap inspired.
This is the story about why I built this Digital D.I.Y film duplicator and how I did, this is an ongoing project and will run untill further notice!
Imagine that you have been photographing with film for a long time, even before digital cameras was born and/or that you have a large amount of mounted slides from your parents or other relatives.
Now you get a great idea, you intend to scan them all to be able to watch them and share them in a more modern and convenient way.
You start to source a scanner that can scan at a quality that is good enough at a price that doesn't punish your wallet to hard, at the end you will probably depending of your financial situation end up with one of the two alternatives below!
Your new scanner arrives and you start to scan your slides. After an hour or two you realize that this will take days and maybe weeks or months depending how large your image library are. Of the two scanner alternatives above the Reflecta is the one that will be most rational and the V850 the most flexible. For top quality, look for a Nikon Super COOLSCAN 5000 ED with batch scanner accessory (Expensive and only available as 2nd hand).
The way I chose to do it is to copy the slides with a DSLR camera and an old modified slide projector and now I will show you how.
The machine to the left is not my creation. It shows the the Slidesnap Pro an amazing machine from the company that has inspired me to do this. slidesnappro.com
This way of digitize the slides will offer high enough quality for all my web use it will also help me to quickly build digital a index of all my slides so that I can quickly find the original slide in my binder or slide magazine the day I want to scan it properly with my slide scanner when I need a high quality high resolution scan.
Basic Parts needed for this project
My version of a speed slide digitizer is easy to build in its most basic configuration and is assembled with use of some cheap and simple components. The slide-projector can be found cheap at your local flea market or other 2nd hand markets like ebay.
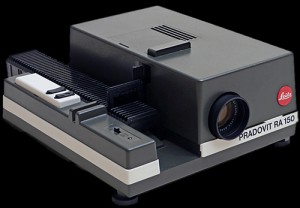
A Leitz Pradovit RA 150 this my the victim for this D.I.Y project, it could have been any projector I suggest you choose whatever you prefer.
I keep my slides in cases containing 5 straight magazines so this type of projector suits me fine.
If I kept them in binders or carousel type magazines then I would go for a Kodak Carousel.
The USB relay-board I have chosen is an ICstation with part number ICSE012A this board is cheap works well but comes with a few drawbacks when it comes to drivers for Win 8 (More about this and how to solve it later on).
Get it at ICstaion.com or my favourit source ebay
A shutter remote release cord that suits your camera. It is also possible to use a wireless remote or USB release all depending on the capability of your camera, just make sure the shutter can be remote released in some way.
I got my cord from a wired remote release bought at ebay for just a few buck, the remote handle was crap but the cord works just fine.
The software Camscan 1.0 is my first ever programing attempt!
It works but could be cuter and more polished in all respects I will work with this until I find it good enough or simply until I had enough of it ;-)
You can chose number of slides to scan, COM port used by the relay card and time delay to allow the camera to auto-focus and take the picture. More about the software and how to get it can be found later in this writeup.
First prototype inspirational video
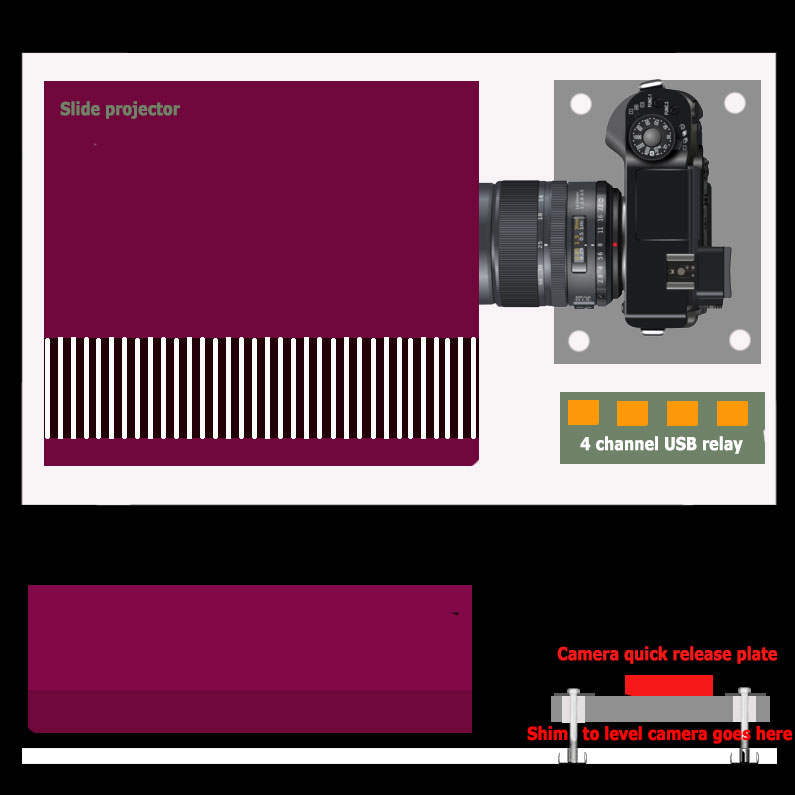
The principal sketch of the D.I.Y slide digitizer
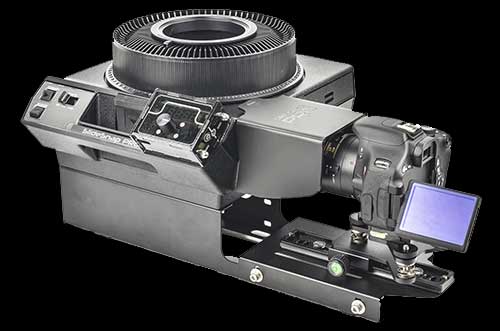
The sketch below try to explain how I made my machine, the white rectangle is a baseplate made of some scrap MDF board. The projector is screwed to the baseboard and shimmed to a height that is near ideal to the vertical position of the camera.
The gray part is another piece of MDF board on witch I mount the camera, I used at quick release that I bought from ebay to make it easy to get the camera at the right position each time I remove and install it again.
The white spots in the gray camera plate is 20mm holes that will make it possible ti fine adjust the camera position.
Step by step instructions how to build the simple mechanics
- build the camera interface plate (gray) and mount the camera you intend to use on it, use a quick release interface to make it more convenient to use.
- Cut the base board large enough to host all the parts and don't cut it to small it is easier to trim it down later if you made it unnecessary large than to enlarge it if it became to small ;-)
- Remove the lens from your slide projector and put it on the base board and load it with a test slide.
- Put the camera with lens on the base board and mount the lens of your choice on the camera. Check leveling and shim the projector until you get close enough for fine adjustment (Center of lens pointing at center of slide frame). Use a bubble lever to make sure that the projector is mounted level with the base board.
- Start the projector to project the test slide. Turn the camera on and move it around until you find the position that will show the whole image frame with the image in focus. Remember to keep the camera parallel to the film slide in all planes (This is critical to get focus over the whole image).
- Make marks on the base board at the center off the 20mm holes that you made in the camera board (the gray one in the image above). Now drill holes for the T-nuts in the base board and install the screws (M4 or M5 is enough) and large washers that will become your fine adjustment assembly.
- Fine adjust the camera board to the final position and use shims to get it in the perfect height and in exact level and then tighten the screws to make it rigid. Take your time, this is a one time set and forget as long as you keep the same camera setup.
The first test of your D.I.Y film scanner
This test is quite simple, turn on the projector and capture some slides with your camera. I suggest that you use a remote release device to avoid unintentional shake.
Now examine the images so find out if the sharpness is good from edge to edge and from corner to corner. If it looks good then you are lucky or maybe been very meticulous in the adjustment procedure, if not check and adjust the camera alignment.
Image to the left is a shoot from the first prototype, the one to the right is a Epson V850 Pro scan. Both image tweaked in PS (Colors are a bit off in the Nikon D7000 "left" image, I will look in to this later).
Remote camera release setup for the slide digitizer
To get this to work you will need a camera that sports a remote camera release wire, a way to control the camera over USB or a IR remote (More about the later later). I own a Nikon D7000 and a Nikon D60 and I will try to cover both alternatives.
As long as your camera sports wired release it will work and be easy, for IR it will require a hacked IR controller or ........... I'm thinking....
This link is a great place to start for camera release wire pin-outs: //www.doc-diy.net/photo/remote_pinout/
 Another test shoot from the first prototype. Download the full high resolution image here to to find out if the quality might be good enough for you!
The download is a Nikon D7000 JPG file set to FINE and straight from the camera.
For me this is more than good enough for my digital "Lightbox" archive, it is also perfectly fine for web use.
Fist actual projector mod - Power LED light source
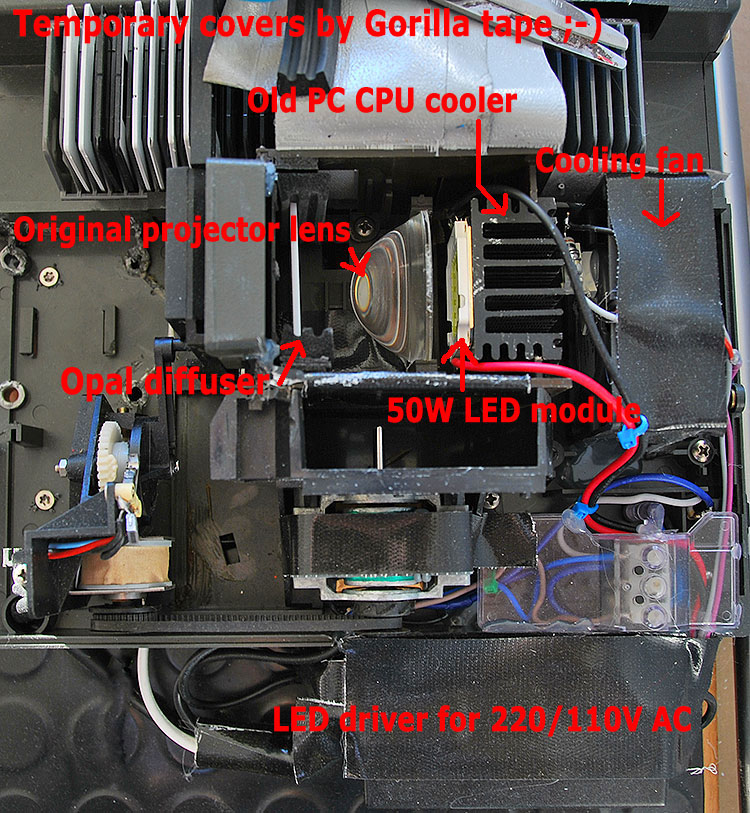
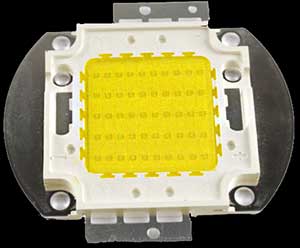
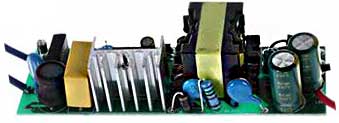
The image above shows my LED light source setup for the DSLR automatic speed slide "scanner". The LED module an driver can be found at Ebay for a reasonable amount of cash the aluminum cooler and fan can probably be found in every DIY selfers stock of "nice to have stuff pile" . In the image you can apart from the 50W led light source, the LED driver, lens and cooler also spot a resistor that are used to control the cooling fan speed.
I went for a 50W cool white square module.
> just make sure it is a 50w and correct voltage for your country and be careful when playing with high voltage mains power!
My aluminum cooler is 50x50x40mm (WxHxD) and the fan I used is 80mm and it takes some plastic cutting to get that to fit the projector. To make it even more easy to fit it might be worth to try water cooling ;-)
Gorilla tape: used in many places to keep things in place and to act as temporary covers to prevent stray light etc...
Further in the image above you can find out that I have cut away the projector lens housing and fittings, I also removed the original lamp cooling fan from the motor shaft.
The fan motor is still there since it also a part of the mechanical slide feed system used in this ancient slide projector.
The original large iron transformer for the lamp motor and control have also been removed and are now replaced with a smaller pc type (you probably already have a redundant one at home)24V DC switching adapter
The 12v DC PC fan is also feed by the 24v supply and the current is simply lowered with a power resistor to get the correct speed (Also doable with a 5v fan).
Software and links
- My python files (Windows) no help give right now so you ned to figur out how ;-)
- Python 3.4 32bit version also needed to run the scripts.
- Further python modules needen is: pyserial, tkinter, multiprocessing
Since python 3.4 is not yet fully suported I might change to 2.7 (If time).