
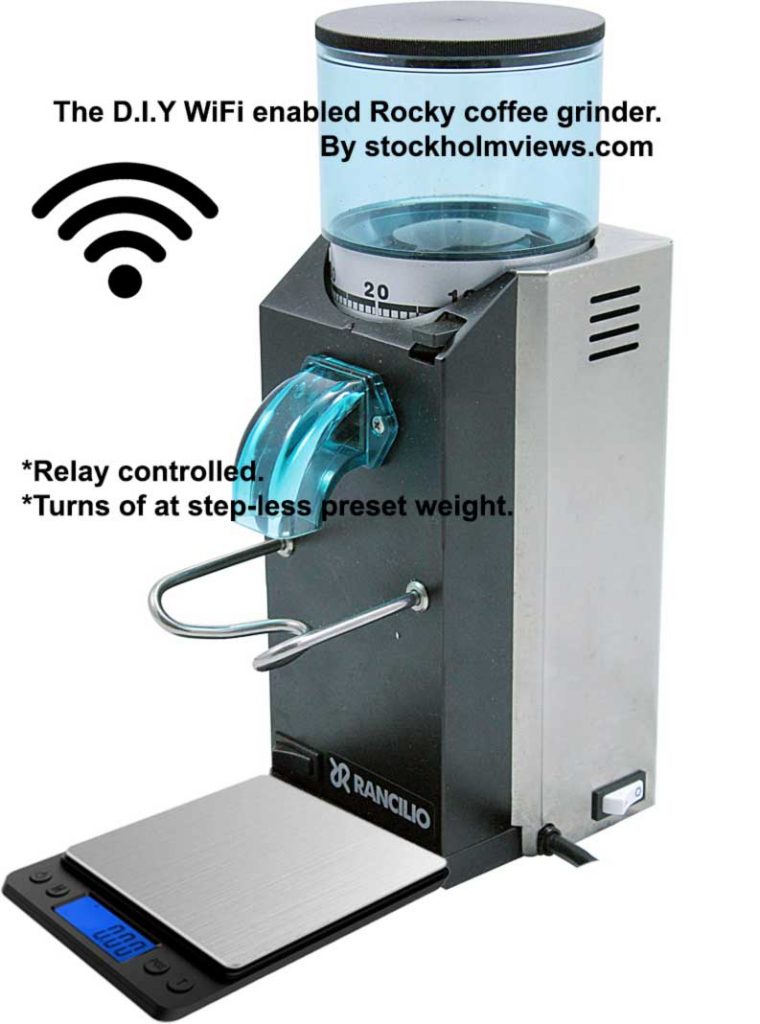
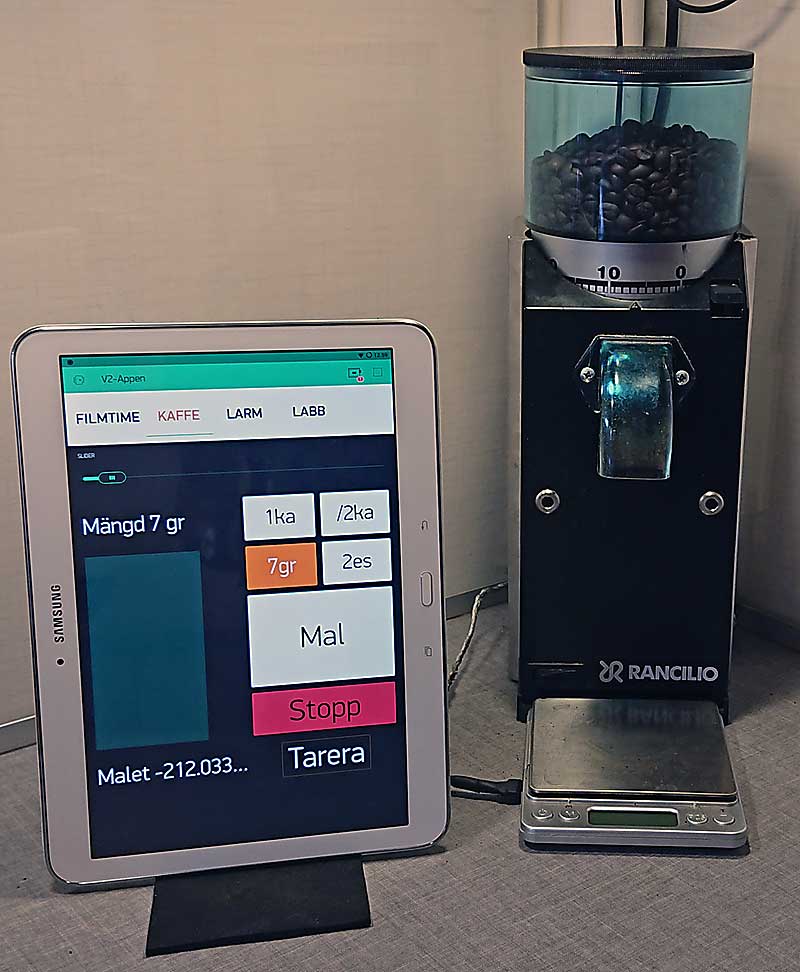
This is the way the grinder hopefully will look. I will remove the portafilter holder. I rather use a long-drink glas to catch the ground beans the poured in to the portafilter or french press (less messy since I can transfer the ground coffee to the brewer/portafilter above the kitchen sink. ;0)
The glas will rest on the scale and scale tare’d before each grinding session .
Description of my grinder mod.
My grinder will have the following features when completely modified.
- A smart scale that grind and then turns off the grinder at a preset weight.
- A app to turn the coffee grinder on and off and that allow me to step-less adjustments of the preset for the final weight of grinding session.
- Wifi interface.
- A way to step-less adjustments of coffee grain size from the app and maybe also some presets (adjustable) like Espresso, French-press, Drip etc.
- Future ideas to come.
- the first ones above are already implemented, the italics are not!
For coding the ESP8266 (I mostly use dev units like WeMos D1 Mini) i have chosen Arduino IDE that are popular and quite easy to get started with. I will not publish any Arduino, Blynk or ESP8266 tutorials here, you can easily find hundreds of them by searching the www.
The hardware for the smart grinder
Hardware used in this project (All product links below goes to AMAZON and will help me to run this website).
- A coffee mill unless you already own one! I design for the Rancilio Rocky since I already own one ;)
- Raspberry PI (For running local Blynk server can be droped if you plan to use Blynk cloud service)
- ESP8266 of any kind I suggest WeMos D1 Mini Pro that can take an external antenna (buy a few they are cheap and you will love them ;-)
- HX711 AD converter with built in amplifier for load cells, I prefer the shielded version. Another popular version (not tested by me) is the SparFun board.
- ESP8266 Relay board i prefer this one ->
- Some 100uF capacitors is optional but will increase the stability of your circuit. I put them close to the power input of each of the ESP8266, Relay and HX711 boards.
- A usb micro power supply to run your circuit from get a 2 amp version for better stability.
- A weight scale or load cell of your choice I went for a cheap 500g digital scale but the taste is ……….. and the wallet to ;)
- + Tools but since you are here you probably already own them!


The code and the circuit
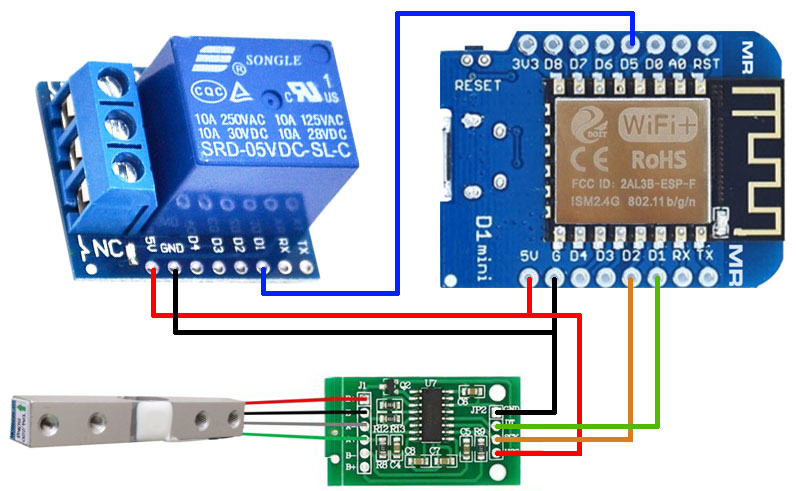
The code and circuit as it stands right now: 27 Mar 2019(Will be updated many times for sure so keep visiting this space).
Arduino Libraries used in this project
HX711_Arduino_Library at version 0.7.2
ESP8266WiFi at version 1.0
Blynk at version 0.6.1
//#define BLYNK_PRINT Serial
#include <ESP8266WiFi.h>
#include <BlynkSimpleEsp8266.h>
#include "HX711.h"
BlynkTimer timer;
int relayPin = D5;  // Change to suit your board.

// HX711 circuit wiring
const int LOADCELL_DOUT_PIN = D2; // Change to suit your board.
const int LOADCELL_SCK_PIN = D1; // Change to suit your board.

HX711 scale;
//Blynk project auth.
char auth[] = "XXXXXXXXXXXXXXXXXXXXXXXXXXXXXXX";
// Your WiFi credentials.
// Set password to "" for open networks.
char ssid[] = "YOUR-SSID";
char pass[] = "YOURPASS";

BLYNK_WRITE(V0) { scale.tare(); // Strain sensor tare
}
BLYNK_WRITE(V2){
  if (param.asInt()) {
    digitalWrite(relayPin, HIGH);  // Relay ON.
  } else {
    digitalWrite(relayPin, LOW);   // Relay OFF.
  }
}
BLYNK_WRITE(V3) {
  Blynk.virtualWrite(V2, 0);
  digitalWrite (relayPin, LOW);   // Grinder interupt (Emergecy stop), Relay OFF.
}
int slider;
BLYNK_WRITE(V11)
{
slider = param.asInt(); // Assigning incoming value from pin V11 (Slider value) to a global variable.
}

void setup() {

  Serial.begin(57600);
  Blynk.begin(auth, ssid, pass, "192.168.254.110", 8080);
  scale.begin(LOADCELL_DOUT_PIN, LOADCELL_SCK_PIN);
  scale.set_scale(1040.f);
  timer.setInterval(500L, HX711data);  // .5 sek delay to unstress the server and stabalize readout on numeric widget @ V1.
  timer.setInterval(60L, HX711relay);  // 60ms delay ono to keep fast stop grinder response and not overshoot grinding to much.
  digitalWrite(relayPin, LOW); // To make sure grinder doesn't start running during boot.
  pinMode(relayPin, OUTPUT);
  BLYNK_CONNECTED();
  Blynk.syncAll();
}
void HX711data()
{
  Blynk.virtualWrite(V1, scale.get_units(20));  // sending calibrated strain sensor value to Blynk value widget.
}
void HX711relay()
{
  if (scale.get_units(20) >= (slider-0)) {
  Blynk.virtualWrite(V2, 0);
  digitalWrite(relayPin, LOW); //Relay OFF change the (slider-0.0) number in seconds with one decimal to compensate if grinder overshoot "Grinder calibration".
}
}
void loop()
{
  Blynk.run();
  timer.run();
}
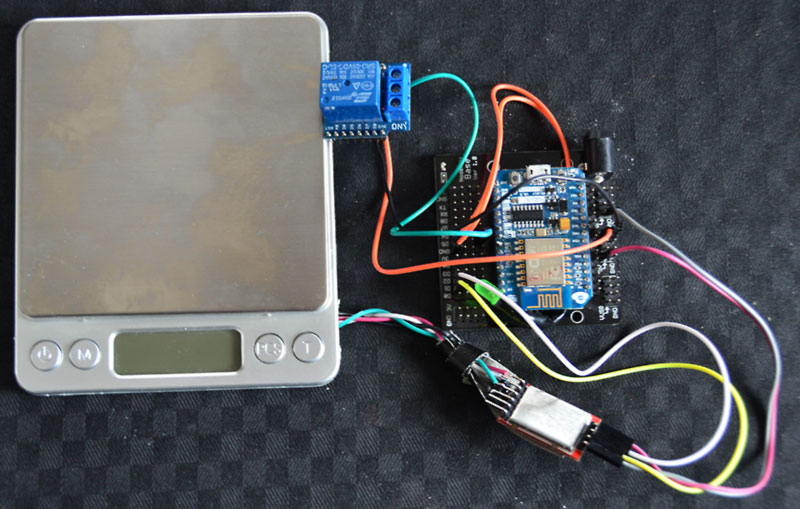
Above my wire nest test setup, the wires running from the 500g digial scale are soldered to the internal circuit board (The scale still operating normally in parallel no batteries needed and display works to !)
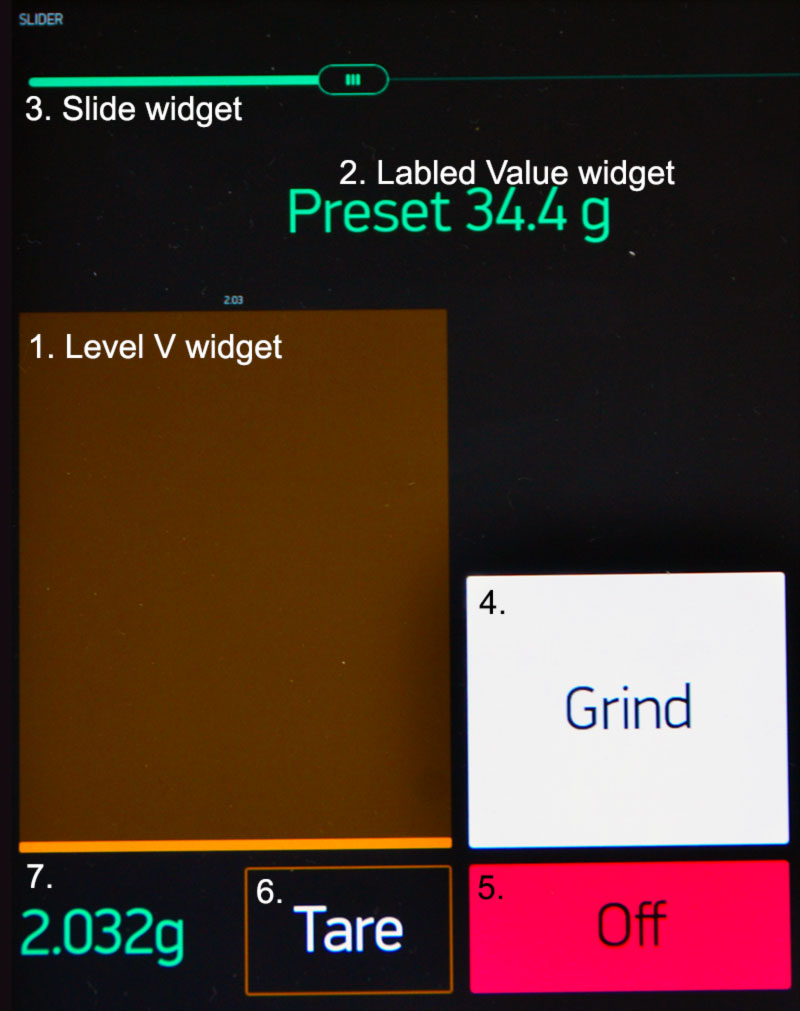
The Blynk Android interface for my prototype I will list the elements an their settings and functions below. V1 etc stand for virtual pins, se Arduino sketch above and read the Blynk manual for further info.
- The “Level V” widget will fill up with color as we grind. (V1 0-100 corresponds to grams in my version).
- The “Labled value” Widget here it shows the preset from the slider 3. (V11 0-80 ‘or your choice’, Push).
- The “Slider” Widget to adjust your desired amount of ground coffee (V11 7-80 ‘or your choice’ , send on release OFF, Show value OFF, #,# for one decimal adjustments).
- “Styled Button” Grind (V2 0-1 Switch button) I labeled my button Grind when off and Grinding on orange background when the grinder are running.
- “Styled Button” Stop (V3 0-1 Push button) can also be stoped by pushing “Grind/Grinding” button when it shows “Grinding”.
- “Styled Button” Tare (V0 0-1 Push button) to zero scale with empty canister resting on the scale surface do this before each grinding.
- Extra function Preset buttons that are not shown above can be added. Just use a “Styled button” in switch mode and put the preset gram numbers in the ON position and you have a quick select for different shots or French Press brewer sizes!
This project will be updated as it progress stay tuned and keep visit :0)
The grinder in action still some tuning to be done thought!Update:2020-03-23
This is my Node-red dashboard control script and gui for the coffee grinder controller
Excuse me for the Swedish language dashboard but that will be easy enough for you to change as required. All about Node-Red (very useful together with Blynk, HAS, OpenHab) and how to install here:nodered.org
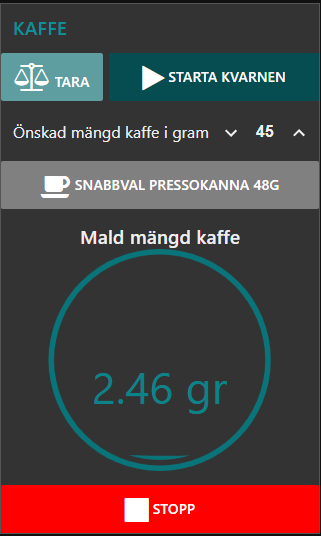
Below the node-Red flow that creates the dashboard above.
Blynk nodes used in this project.
node-red-contrib-blynk-api
node-red-contrib-blynk-ws
node-red-contrib-ui-level
node-red-node-ui-lineargauge
node-red-dashboard
[
{
"id": "b5b3c1ca.3917b",
"type": "blynk-api-out-write",
"z": "c6996a65.051b98",
"name": "Tara",
"type_connect": "api",
"pin_type": "V",
"pin": 0,
"client": "36dc8ce1.15a254",
"x": 250,
"y": 20,
"wires": []
},
{
"id": "de46ba7c.a5ad38",
"type": "ui_template",
"z": "c6996a65.051b98",
"group": "8063faae.969a88",
"name": "Tara",
"order": 1,
"width": "2",
"height": "1",
"format": "<style>\n.nr-dashboard-template {\n padding: 0px;\n}\n</style>\n<div class=\"momentary\">\n <md-button style=\"width:100%; height:48px; margin: 0px; background-color: #5F9EA0\"><i class=\"fa fa-balance-scale fa-2x\"></i> Tara </md-button>\n</div>\n\n<script>\n\n(function($scope) {\n \n$('.momentary').on('touchstart mousedown', function(e) {\n e.preventDefault(); //prevent default behavior\n $scope.send({\"payload\": 1});\n});\n\n$('.momentary').on('touchend mouseup', function(e) {\n e.preventDefault(); //prevent default behavior\n $scope.send({\"payload\": 0});\n});\n \n})(scope);\n</script>",
"storeOutMessages": true,
"fwdInMessages": false,
"templateScope": "local",
"x": 110,
"y": 20,
"wires": [
[
"b5b3c1ca.3917b"
]
],
"icon": "font-awesome/fa-refresh"
},
{
"id": "dae6db62.4c4358",
"type": "blynk-api-out-write",
"z": "c6996a65.051b98",
"name": "kvarnen",
"type_connect": "api",
"pin_type": "V",
"pin": "2",
"client": "36dc8ce1.15a254",
"x": 300,
"y": 160,
"wires": []
},
{
"id": "510988f2.6b9fc8",
"type": "ui_button",
"z": "c6996a65.051b98",
"name": "",
"group": "8063faae.969a88",
"order": 2,
"width": "4",
"height": "1",
"passthru": false,
"label": "Starta kvarnen",
"tooltip": "",
"color": "",
"bgcolor": "",
"icon": "fa-play fa-2x",
"payload": "1",
"payloadType": "num",
"topic": "",
"x": 140,
"y": 120,
"wires": [
[
"dae6db62.4c4358"
]
]
},
{
"id": "11fb1765.031bc9",
"type": "ui_button",
"z": "c6996a65.051b98",
"name": "",
"group": "8063faae.969a88",
"order": 6,
"width": 0,
"height": 0,
"passthru": false,
"label": "Stopp",
"tooltip": "",
"color": "",
"bgcolor": "RED",
"icon": "fa-stop fa-2x",
"payload": "0",
"payloadType": "num",
"topic": "",
"x": 110,
"y": 160,
"wires": [
[
"dae6db62.4c4358"
]
]
},
{
"id": "3c2af8fa.746328",
"type": "blynk-api-out-write",
"z": "c6996a65.051b98",
"name": "",
"type_connect": "api",
"pin_type": "V",
"pin": "11",
"client": "36dc8ce1.15a254",
"x": 610,
"y": 220,
"wires": []
},
{
"id": "673ab496.6f611c",
"type": "blynk-api-in-write",
"z": "c6996a65.051b98",
"name": "",
"pin": "11",
"pin_type": "V",
"pin_all": 0,
"client": "36dc8ce1.15a254",
"x": 120,
"y": 260,
"wires": [
[
"e3030e5.07003f"
]
]
},
{
"id": "20d742f8.6d6ece",
"type": "blynk-api-out-read",
"z": "c6996a65.051b98",
"name": "",
"type_connect": "api",
"pin_type": "V",
"pin": "1",
"client": "36dc8ce1.15a254",
"x": 320,
"y": 80,
"wires": [
[
"559ec9.cb5ec138"
]
]
},
{
"id": "44e73406.d0dbfc",
"type": "ui_button",
"z": "c6996a65.051b98",
"name": "48g",
"group": "8063faae.969a88",
"order": 4,
"width": 0,
"height": 0,
"passthru": false,
"label": "Snabbval pressokanna 48g",
"tooltip": "",
"color": "",
"bgcolor": "GRAY",
"icon": "fa-coffee fa-2x",
"payload": "48",
"payloadType": "num",
"topic": "",
"x": 290,
"y": 220,
"wires": [
[
"3c2af8fa.746328"
]
]
},
{
"id": "559ec9.cb5ec138",
"type": "ui_gauge",
"z": "c6996a65.051b98",
"name": "",
"group": "8063faae.969a88",
"order": 5,
"width": 0,
"height": 0,
"gtype": "wave",
"title": "Mald mängd kaffe",
"label": " gr",
"format": "{{value | number:3}}gr",
"min": 0,
"max": "100",
"colors": [
"#00b500",
"#e6e600",
"#ca3838"
],
"seg1": "",
"seg2": "",
"x": 530,
"y": 80,
"wires": []
},
{
"id": "c77e2507.d1dcf8",
"type": "inject",
"z": "c6996a65.051b98",
"name": "",
"topic": "",
"payload": "",
"payloadType": "date",
"repeat": "1",
"crontab": "",
"once": false,
"onceDelay": 0.1,
"x": 150,
"y": 80,
"wires": [
[
"20d742f8.6d6ece"
]
]
},
{
"id": "e3030e5.07003f",
"type": "ui_numeric",
"z": "c6996a65.051b98",
"name": "",
"label": "Önskad mängd kaffe i gram",
"tooltip": "",
"group": "8063faae.969a88",
"order": 3,
"width": 0,
"height": 0,
"wrap": false,
"passthru": true,
"topic": "",
"format": "",
"min": 0,
"max": "100",
"step": 1,
"x": 360,
"y": 260,
"wires": [
[
"3c2af8fa.746328"
]
]
},
{
"id": "36dc8ce1.15a254",
"type": "blynk-api-client",
"z": "",
"name": "KAFFE",
"api": "http://192.168.1.40:8080/",
"path": "ws://192.168.1.40:8080/websockets",
"key": "48066fc6d08742709d783cd691cad278"
},
{
"id": "8063faae.969a88",
"type": "ui_group",
"z": "",
"name": "KAFFE",
"tab": "61173baf.ef1624",
"disp": true,
"width": "6",
"collapse": false
},
{
"id": "61173baf.ef1624",
"type": "ui_tab",
"z": "",
"name": "KAFFE",
"icon": "dashboard",
"order": 1,
"disabled": false,
"hidden": false
}
]