
This is a super easy to build bluetooth interface for TTL glas/magnetic scales and rotary encoders that will work with the amazing TouchDRO Android app.
The naked truth of simplicity
This interface with some cheap or expensive scales will give you a super slick DRO setup for many different types of machines and one of the coolest features is the ability to create profiles for different machines on the same Android device in a way that you can run measurements all your machines on the same android device as long as you not using them simultaneously.
However the main reason for building this interface by myself rather than buying from Yuriy is that I live in Stockholm where the shipping, tax, and customs fee will be almost as much as the interface it self cost me!
If you are in the part of the world where such fees does not apply then the price of a pre made interface is well worth it (Get the new ESP based interface).
If you like to make your own interface for the same reason as I had or just for fun or a challenge the links to for the kind of parts I bought can be found at the bottom of this page :)
ESP32 Development board
To make this project as simple as it can be done get a pre soldered ESP32 development board of the flavor you prefer. 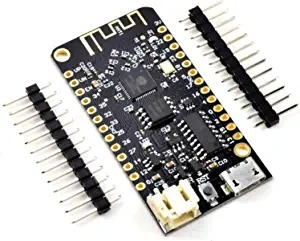 I would go for a board with built in charger and LiPo battery connector as this will help you to keep the current position stored in case of a power interrupt (Power outage).
Amazon assortment of ESP32’s

Pinout for cross reference in case you want to use other ESP32 board.
Scales for this project
I went for some eastern made 5u glass scales you can chose the same or go for higher grade scales just make sure to get TTL linear scales that will run at 5V. I went for som “Sino KA500 120mm and KA300 670mm for my EMCO Maximat 11CD they fit but the aftermath tells me that I would have chosen 130mm for X axis and of course Amazon sells DRO glass scales to ;) If you have other preferences you may also chose magnetic scales just make sure to get TTL compatible scales.
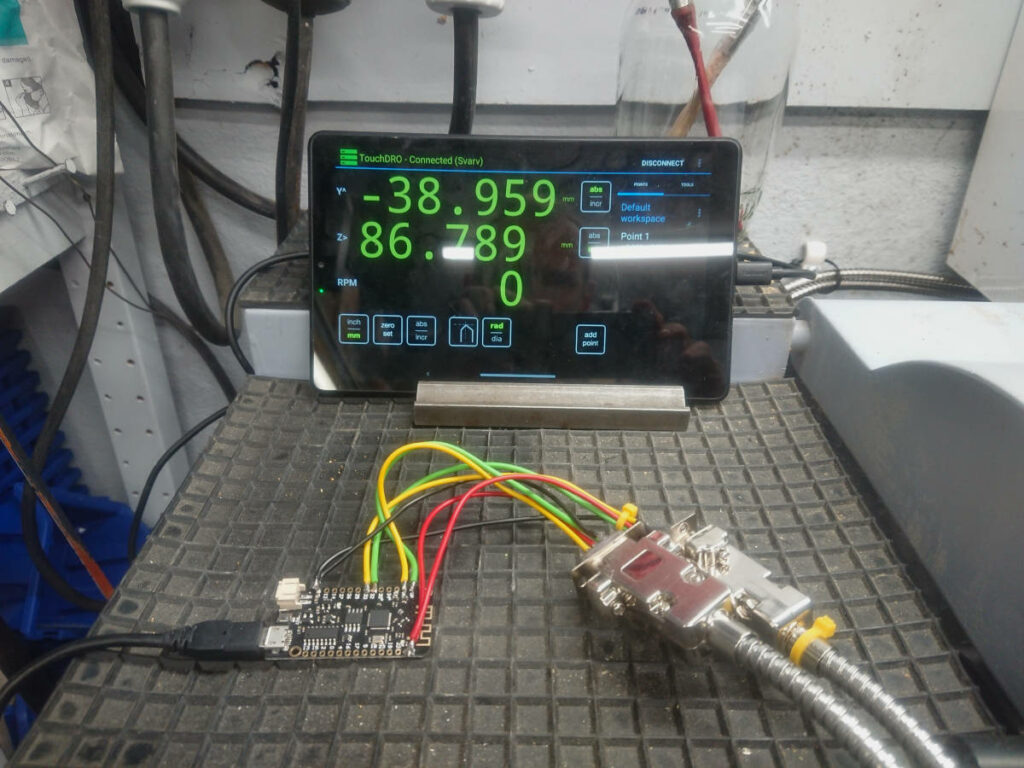
Android tablet + touchDRO + ESP32 + Sino KA500 glass linear scale
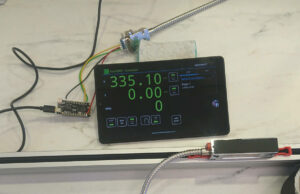
Bench test of TouchDRO setup. Nothing more than this is needed for one axis and just another connector and scale is needed to make up for a complete 2 axis lathe DRO system.
Schematics for the super easy to build 32 bit TouchDRO interface
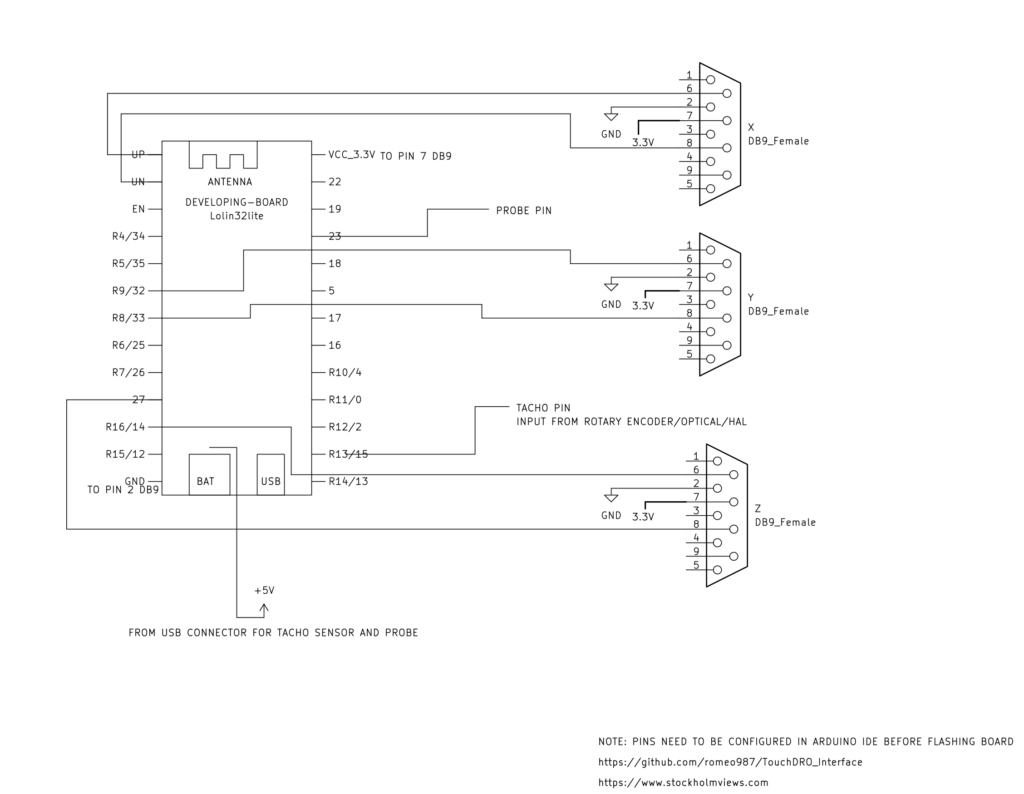
The schematics above looks crude but works just fine with the Sino scales that I have tested it with.
->right click the image above “open in new tab” to zoom the schematics<-
I might publish a complementary schematics later on that will feed the scales with 5V instead of 3.3V but this will require some TTL level shifters and make it a little bit more complex so in that case I need to make a motherboard to carry and connect the Lolin32 and the additional components together.
However for now I find no need for it and will keep it clean and easy and use the above schematics until and if any issues will show up.
The TouchDRO Lolin32 Lite Arduino sketch
/*
	Name:       DRO_front_end.ino
	Created:	05-May-20 4:49:02 PM
	Author:     romano
	Emulates the original TouchDRO Launchpad interface (https://www.yuriystoys.com/p/android-dro.html)
	between quadrature scales and the android TouchDRO application, but permits the higher pulse rates
	required by high resolution scales. Also emulates the Tacho function (with improved resolution), and the
	Probe function.
	This version contains numerous conditionally compiled debug lines.
*/
#include "ESP32_Touch_Tacho.h"
#include "ESP32_Quad_Encoder.h"
#include <BluetoothSerial.h>

//Define Bluetooth device name. This is the name that will appear in the tablet's BT device list
#define BTString "Maximat CD11 Super" //Put your preferred name here

/*Define 4 encoders here in any order. At least one active instance would be good.

Format for active instances is "ESP32Encoder(axis, aPin, bPin, Type, Pullup, Filter)"
where:
axis			One of (x,y,z,w) used to identify data transmitted by BT to TouchDRO. Any order.
				Encoder can be deactivated by assigning another encoder (lower down) to the same axis
aPin			These are the actual ESP32 GPIO Pin numbers
bPin
Encoder Type	(single, half or full quadrature). Encoder can be de-activated by making type = "na"
Pull-up/down	(up, down, none) applied to both a and b pins. Note that pins 34-39 are always "none".
filter time		Filter to reject short pulses. 0-1023 increments of 12.5nS. 0 is no filter.

Unused positions must define a null instance "ESPEncoder()"

DEFAULTS
ESP32Encoder Encoder[MAX_ENCODERS] = {
ESP32Encoder(y, 32, 33, full, none, 40),  //define encoders in these lines
ESP32Encoder(x, 39, 36, full, none, 20),//....
ESP32Encoder(z, 27, 14, full, none, 1023),//....
ESP32Encoder()
};
*/

ESP32Encoder Encoder[MAX_ENCODERS] = {
ESP32Encoder(y, 32, 33, full, na, 40),  //define encoders in these lines
ESP32Encoder(x, 39, 36, full, none, 40),//....
ESP32Encoder(z, 27, 14, full, none, 40),//....
ESP32Encoder()
};

/* Define tacho here.

Reports pulses per minute.
Pulses per rev is included as a proxy to disable the tacho, but otherwise to (potentially; not
implemented in this version) average the values over a complete rev in case multiple sensors are
not equally spaced. Algorithm works by measuring micros() between pulses,
so will give best resolution if number of sensors is small.

If used, format is  "ESP32Tacho Tacho(Pulse PinNumber, Direction Pin Number, PulsesPerRev, Pullup)"
If direction is not used, make the Pin 0 or same as pin A.
If not used, define null instance "ESP32Tacho Tacho"
If pulsesPerRev <= 0, tacho will be ignored.
Pull up/down as for encoder above.
*/

ESP32Tacho Tacho(15, 0, 1, down);
//ESP32Tacho Tacho;

//**************End of User Configuration*************************

//#define debug  //echo data to serial for debug
//#define debug2 //turn off BT to speed things up during debug
#define LEDPin 2
#define probePin 23

#ifndef debug2
BluetoothSerial SerialBT;
#endif
int loopcounter;
int tachoReportCounter;
int stringOrder[MAX_ENCODERS]{ -1,-1,-1,-1 };//ordering of installed encoders to construct output string
String outputString;
const char axisLabel[5]{ "xyzw" };//NB inverse relationship of this and axisType enum!!
unsigned long prevMillis;
bool probeActive;

void setup()
{
#ifdef debug
#define TestPin 2
	Serial.begin(115200);
	pinMode(TestPin, OUTPUT);

	loopcounter = 0;
#endif
#ifndef debug2
	SerialBT.begin(BTString);
	pinMode(LEDPin, OUTPUT);
#endif
	pinMode(probePin, INPUT_PULLUP);
	probeActive = false;
	prevMillis = 0;
	tachoReportCounter = 0;
	// Attach installed encoders
	int i = 0, j = 0;
	for (i = 0; i < MAX_ENCODERS; i++) {
		if (Encoder[i].type != na) {
			Encoder[i].attachEncoder(i);
			Encoder[i].clearCount();
			j = (int)Encoder[i].axis;
			stringOrder[j] = i;
		}
	}
	if (Tacho.pulsesPerRev > 0) {
		Tacho.attachTacho();
	}
}
void loop() {
	//assemble dataBlock for periodic output to TouchDRO app
	//transmit in x-y-z-w-p-t order regardless of encoder assignment order. This may not be necessary.

	unsigned long currentMillis = millis();
	int probeState;
	if (currentMillis - prevMillis >= reportPeriod) {
		prevMillis += reportPeriod;
		int i = 0;
		outputString = "";
		for (i = 0; i < MAX_ENCODERS; i++) {
			outputString += axisLabel[i];
			if (stringOrder[i] == -1) {
				outputString += "0";
			}
			else {
				outputString += String(Encoder[stringOrder[i]].getCount());
			}
			outputString += ";";
		}
		if (digitalRead(probePin) == 0) {
			probeActive = true;
		}
		if (probeActive == true) {	//only report probe state after it has awoken
			probeState = digitalRead(probePin);
			outputString += ("p" + String(probeState) + ";");
		}
		if (++tachoReportCounter >= tachoReportInterval) {
			tachoReportCounter = 0;
			if (Tacho.direction == 0) {
				outputString += ("t" + String((int)Tacho.get_ppm()) + ";");
			}
			else {
				outputString += ("t-" + String((int)Tacho.get_ppm()) + ";");
			}
		}

#ifndef debug2
		//print dataBlock via BT takes around 106uS, regardless of string length
		if (SerialBT.hasClient()) {
			digitalWrite(LEDPin, HIGH);
			SerialBT.print(outputString);
		}
		else {
			digitalWrite(LEDPin, LOW);
		}
#endif
#ifdef debug
		if (++loopcounter == 26) {
			loopcounter = 0;
			Serial.println(outputString);
		}
#endif
		}
	}
The code above more or less contain all the information and comments that will guide you to set it to you desired configuration, if you use a different ESP32 board you might want to use other pin number definitions and depending on how fast you intend to move your axis you may want to adjust the filtering.
Get the files from github and make sure to install ArduinoIDE and the libraries needed (I will not cover Arduino installation or usage here you can find tutorials and information about that all over the www).
In case you want to ad a tachometer for spindle rpm it is easy to make an encoder with some of the shelf hal sensor boards and a couple of magnets I will cover that in a separate section on this website.
Probe funktion is new and will be introduced in TouchDRO V3 whenever that will be released (Probably during 2022).
Installation of the linear scales
In the case of my Emco Maximat 11CD (You can of course use this for a mill or drill as well or any other project that require a precise linear measurement) I chose to install the scales in the way the picture below shows.
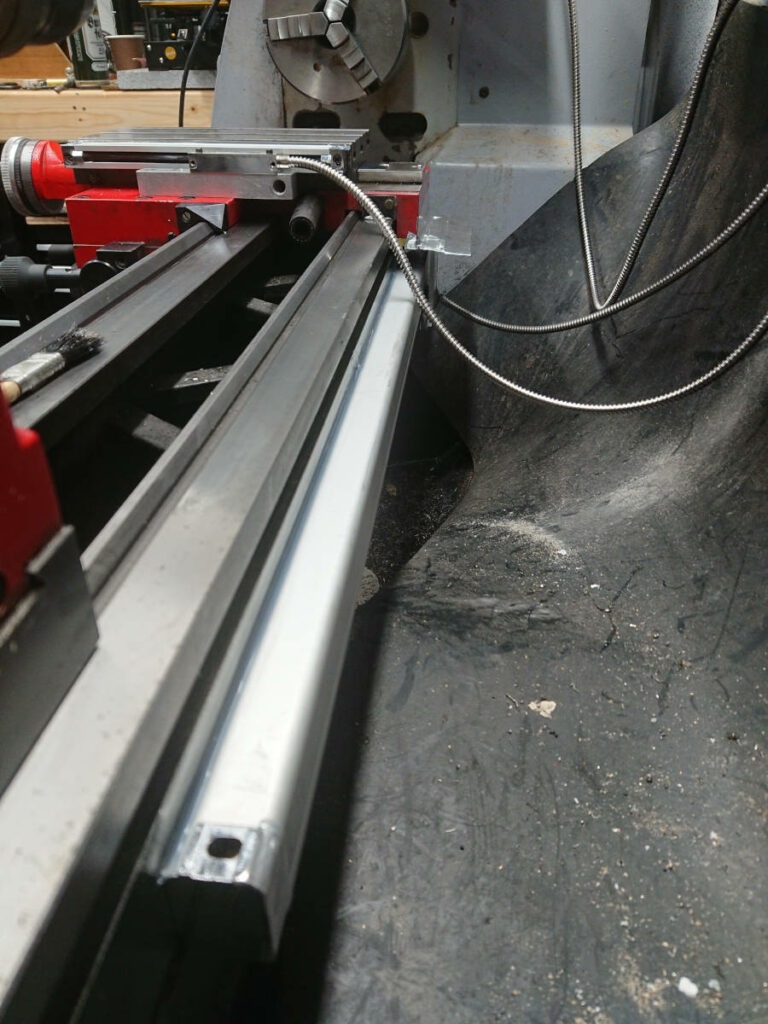
To the right of the cross slide to have it as far as possible from the chuck, this makes it a bit awkward if you want to be able to adjust the cross slide gib frequently it is also sub optimal orientated in regard of dust and fluid ingress but that problem are now addressed by installing a protective plate above the scale.
How you actually should install you scales is covered by the manual you get when you buy the scales or by the link at the bottom of this page but sometimes you have to be a bit creative all depending how much space you have on your machine.
I may make a locking feature for the chuck side of the cross slide to be able to lock it att occasions as this can be useful when you are using the top slide to cut tapers, stay tuned and keep coming back to stockholmviews.com.
Buying a ready made interface in Europe
At the time being Yuri does not have the possibility or interest of producing enough boards or having the logistics for supplying European with board inside the European boarder so the only way is to buy from US with all the additional expenses and hazzle that comes with that. If I get interest enough I might design a boards that could be bought in Sweden and the rest of EU at a fair price so just let me know and I will count the demand and take a decision and this will be done in agreement with Yuri but without him giving any tech support or being responsible for a spinoff product like this.
Enclosure for the DIT TouchDRO interface
I will upload some 3D printable stuff here later ;)