
The Range Rover P38 page (Range Rover II)
This section of my website is dedicated for information regarding my happy
and joyful moments with a second hand Range Rover P38 ano 1999 (well.. not
always a joy:0)
|
 Join my Range Rover P38Group now! |
|---|---|
|
|
|


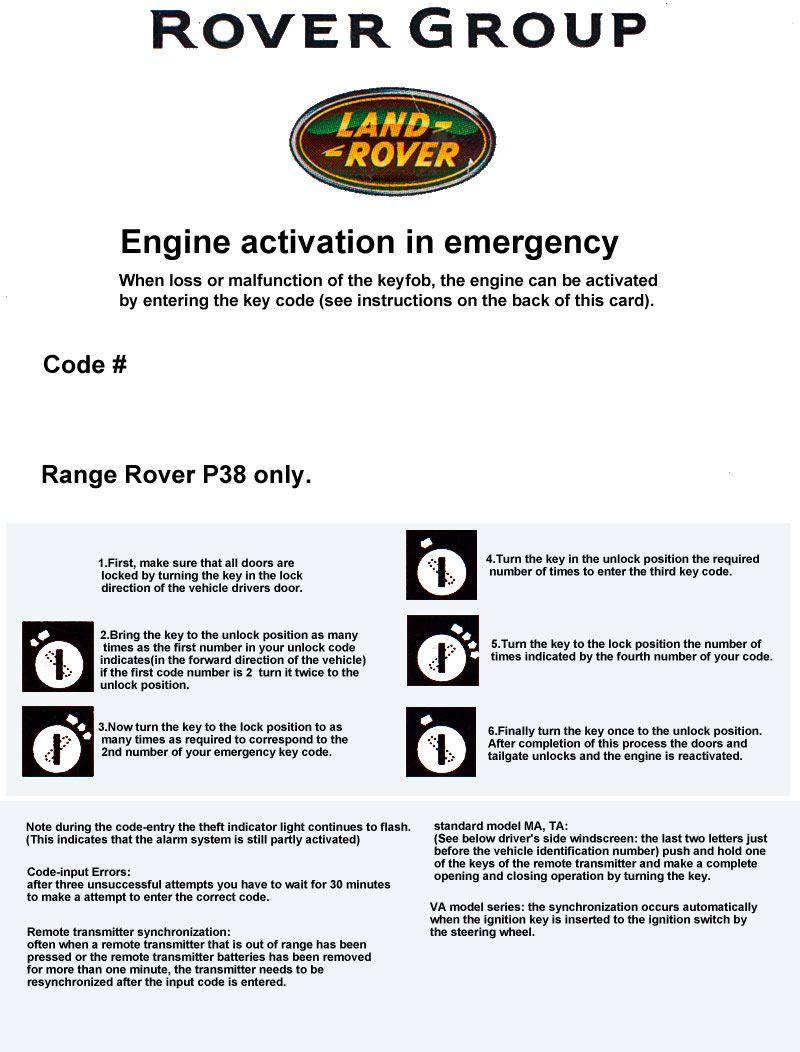
Lost your Range Rover emergency engine activation card?
|
I still have my original card but Please don't be shy if you find anything wrong , just let me know about it so I will get a chance to correct it. Click the image to the left to enlarge it or right click and chose "save link as" to download Translation Text file download here make corrections as/if required and send it to me please! |
|---|
Basic car electrical trouble shooting tips
I have started to write a new page for my Range Rover P38 section.
This page will be about basic electrical trouble shooting and hopefully I will help
some P38 owners to get some hints how to cure the unfortunally not so uncommon
electrical Gremlins that can cause the most patient Range Rover owners to lose their
temper. go there to read the first part [Relay diagnostics].
I'm in the planing and stage of a dual battery installation for my Rangie. The reason?
Well I don't use my RR as often that I should or want and quite a few times I have
found my battery drained when I want to take a ride.This isn't because of a abnormal battery drain caused by a fault in my car it's just
that my car can be parked for two to three weeks and this would drain the battery
of many modern vehicles and it did so even in my previous car a BMW.I have been prepared for this so I keep a spare battery and a pair of jump wires in my
trunk just in case, but opening the bonnet each time I would like to drive the car isn't
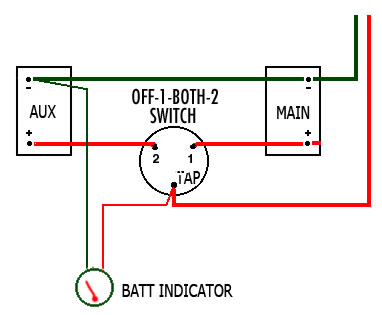
as convenient that I would like to have it.My plan looks like this: A dual battery system with a battery selector that can be
controlled from the cabin of my Rangie and the plan is that this should happen
during 2011 so stay tuned and keep an eye on this space :0)
Circuit to the left is the base layout for my dual battery circuit.
The schematic will however be
worked over and in the end it might
be changed. It will also become a
little more complex due to the
charging circuit.
The main battery will be the one
that will be in use under most circumstances butt the wiring I will
use is suppose to stand-up in case I
need to use the Auxiliary battery for
engine starting if needed!
That's all for now!
My tailgate push button have miss behaved the last 6 months, not all the time but
now and then and more frequently when outdoor temperature creeps down to -10C
and colder. I thought it was time to do something about it and it showed to be a
quite easy problem to cure.In two easy steps you can get the tailgate push-button and switch assembly in your
hand and in a few more steps you have cured the stickiness :0)
- Open the tailgate lift the flap that covers the tailgate hinge gap and release the
tree plastic fasteners that holds the tailgate trim panel.
- Locate the switch/tailgate push-button and remove the electrical connector and
the two screw that are holding the push-button easy in place.
- Turn/twist the switch/push-button assembly until you can easily remove it
from the tailgate
Now follow the steps below to dismantle the push-button to clean and adjust it.
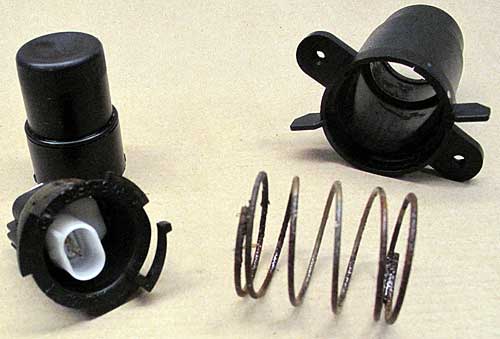
The tailgate switch parts of the P38. The small "arm" with a tab that you can see on
the actual switch part is the a latch that holds the switch in the correct position in
the push-button body. This latch has to be released/pushed aside then you can easily
twist the switch part about a quarter turn to remove it from the push-button body.Now you have four parts on the table, the push-button, body, spring and switch.
All the parts can now be properly cleaned from dust and other stuff that have found
a way to get in there during a few years of driving.My spring was quite corroded and I would have changed it if I had a new one on hand
but I didn't so I just used some abrasive paper to remove the worst corrosion.
The corrosion was also the main reason why the button was sticky.The spring didn't slide as smooth as it should it the plastic housing so the spring force couldn't manage to push the push-button out again when depressed.
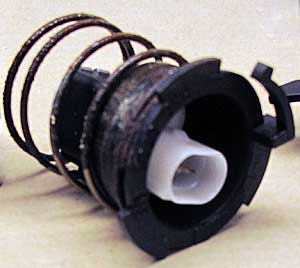
When the switch housing is cleaned and the spring is either disposed and replaced
or reconditioned as described above it is now time to put it together again.
Use a very small amount of grease on the spring, this is not for lubrication but to
protect it a bit against moister and to prevent new corrosion to take part or at least
to help to delay it.
Now put the push-button together again.
(you know how to do that since you just took it apart don't you :0) Now test it a few times to make sure
it works smooth and don't get stuck again. If it doesn't just take ita a part again and
make some adjustments. I had to use a pair of pliers to adjust the spring to become
a little bit smaller in diameter just to slide better in the switch/pb body. I also
stretched the spring a little bit to increase the spring force just to make sure to get
that button to return back out again :0)
That easy!
This is the prolouge to the actual review that can be found here!
When I first got my Range Rover P38 I was looking for some unexpressive diagnostic
equipment to aid my trouble shooting in the erratic HEVAC system. I didn't find any
realy cheep solution like the one I used with my good old BMW to witch I could get
an interface and diagnostic software package rely cheap and so can owners of cars
made by VAG and many other car makes but nothing for us poor guys (or girls) that
own an old P38.
Unlike some other cars and car brands the Range Rover P38 (And most Land Rovers
and Rovers) require a quite sophisticated hard and software to retrieve those usefull
fault codes.
I have tried some common standard OBD2 interface/software combos and have
had some but limited success with those. Whit a standard OBD2 setup I was able
to read engine live data and fault codes but can't get any information from the other
parts of the car like the gearbox, ventilation, body electrics and electronics or air
suspention.
By web search I finally found the excellent EAS unlock suite from rswsolutions.com
that makes it possible to trouble shoot the Air suspension system and also reset the
faults.
OK, engine and suspension can now be diagnosed for a small sum of money but when
it comes to the rest of the P38's systems I had to dig a bit deeper in my pocket
(However it is still worth it).
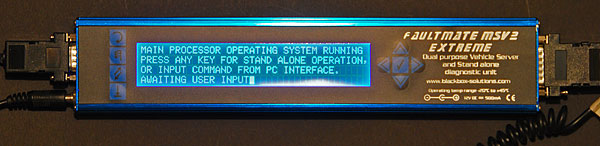
Further searches on the net indicated that the FAULTMATE MSV-2 could be the answer
for my needs and at a price tag that I might be able to accept if only barely :0)
The Faultmate MSV-2 Exreme powered up and waiting for instructions.
|
As my experience increases my eyes gets lousier (I was born in early 60's), however I still
like my old P38 despite the charm of this legendary car and it's habit to call for
attention and maintenance.
Now I'm ready to make an attempt to improve the headlights. Since the aftermarket
HID Xenon upgrade Kit's has become very cheap those days I bought two of them.
A H4-4 kit for the Low/High beam main light and a H1 kit for the auxiliary driving
lamp that is part of the same headlight assembly of my P38 (1999 model)Best places to get the HID
kit's at a nice price is Amazon.com
.
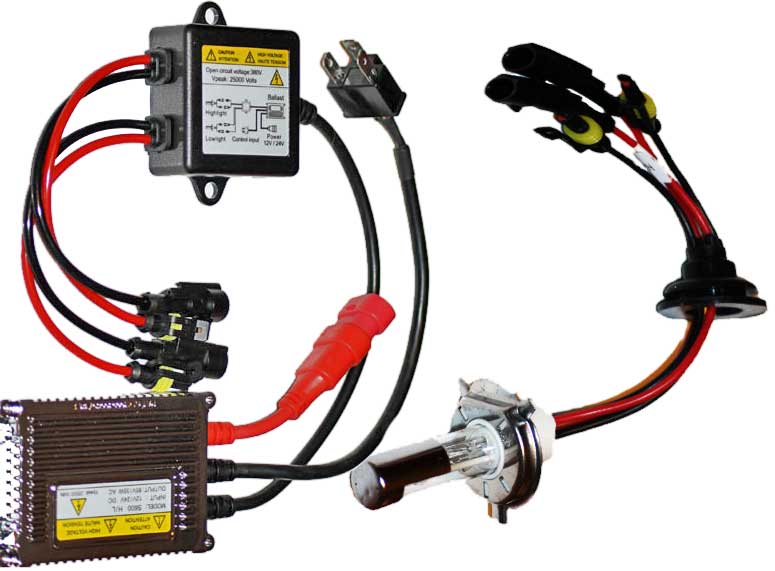
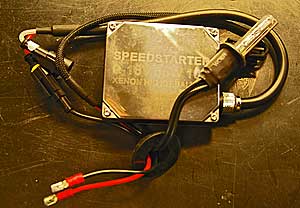
The H4 kit I bought was of the new type with a dual filament |
This is the H4-4 Dual HID kit that I bought
|
Take a look at the picture to
|

How to connect the Dual H4-4B HID Kit to a Range Rover p38
I had read about issues with bulb failure warnings would show up on the display
when after market HID kits is installed but I thought it must be possible to solve
such problems in one way or another.
Like a good customer I first followed the hook-up instructions that came with my kit.
When I was done with the installation and finally tested my new lights I was facing
that infamouse bulb warning for all my lights, low and high beem failed :0(
The simple and most common solution for this problem would be to shunt the system
with load resistors to fool the system to belive that it is equiped with regular 50W
bulbs. This isn't the way I ant to do it because if I do it like this I would load the car
electrical system with 100 usless watts, thats almost 10 Amp!!!
So I decided to try another way of wiring it and it worked just fine, I will now show you how I did it.
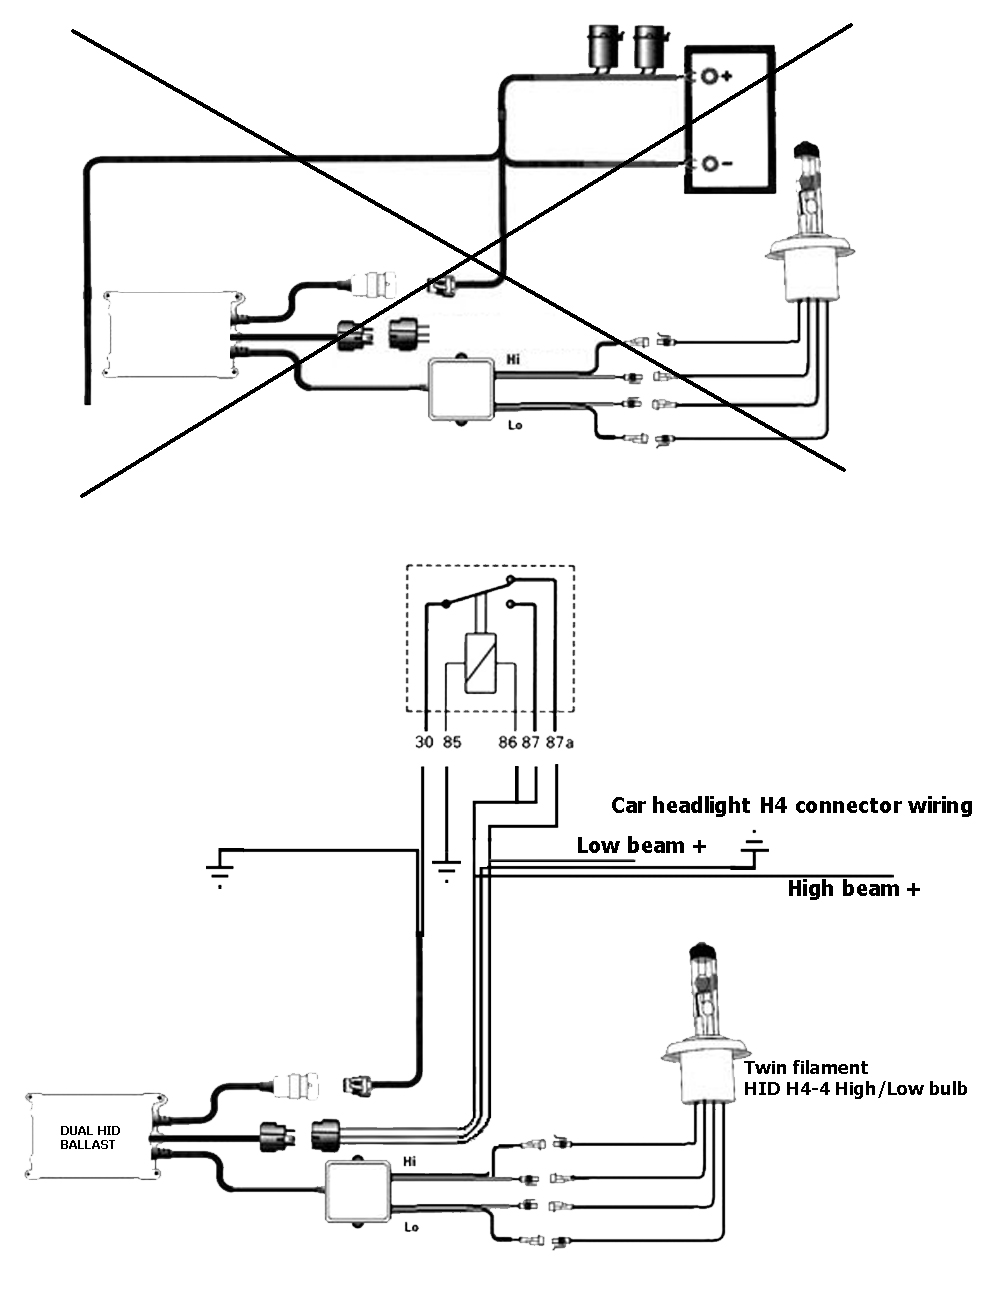
The upper part of this image (the crossed out schematics) was the schematics I got with
my kit. I wired my Rangie exactly like that and came out with the "Bulb failure"
result.
I then redrawed the schematics and connected the HID kit like in the lower part
of the image to power the HID Ballast and bulb from the original bulb feed wiring
and here by loading them with about the same current as the original bulbs did
rather than just using them to control the lights (Like in the upper schematics).
Hooked up like this everything works just fine and no signs of bulb failure warnings.
As a bonus the bulb failure system now works as supposed and warns if a HID lamp
or ballast ends it's life.
|
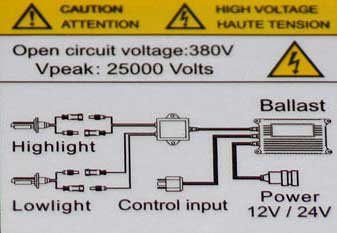
Read the cautions and warnings before you play |
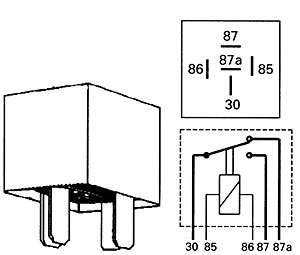 |
Layout of the switching relay. Low beam wire from the car's H4 connector is connected to the 87a terminal (Closed when relay is relaxed) And the High beam to the 87and86 so that it when powered closes the relay and cause the low beam to become open circuit while the High beam circuit now closes and powers the ballast. At the same time the High/Low leads connects to the ballast control input and ignites the sellected bulb element in the dual HID bulb, no moving parts involved. |
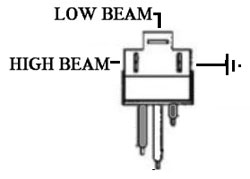 Typical H4 connector (Female) |
Step 2 in the P38 Headlight upgrade
The Bi-Xenon part of the headlight is now done and works like a dream, time to to
the driving light part of the headligt that normaly is equiped with a H1 55w bulb.
 |
Compared to the H4-4 Bi-xenon installation the H1
|
Step 3 the side light (Aka FWD Parking light bulb)
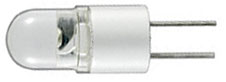 |
Since I already had the headlight assemblies removed and on the work bench I decided to replace the sidelight with LED lamps. To increase the bulb life and to get a kind of light that matches the HID's. The bulb I went for was a 12V 0,2W LED that's meant to replace a G10 socket 5W Halogen bulb. Led bulb advertised to be Warm white. |
I just cut of the original lamp holder/connector to hook up this LED to the side light
circuit and crossed my fingers, did it light up? YES!
D did I get any bulb warnings? YES :0(
Any solution to the bulb warning problem?
Yes, but this time the only solution was to shunt the lamp. My choice was a
47Ohm 5w resistor in paralell with the bulb, that doesn't realy equal the
original load of a 5w bulb but it worked :0)
I also have plans to replace all other external light with LED's but that's a future
project and the only bulbs that isn't monitored is the side repeters so I got to get
a lot of power resistors to shunt all of the bulbs in the rest of the external lightning
system.
By surfing on loots of Range Rover P38 web forums and websites I have found
out that it is quite popular to convert the p38's headlight to a more up to date
L322 style.
The more I looked at those P38-L322 transforming modifications the more I
disliked them. I want my p38 to stay P38 since even if I change the face it will
never become a L322 anyway. The L322 is a completely different car in some
respects better than the P38 but sertenely not in all aspects.
However I do like the latest P38 style headlights with the black surrounding trim
(post 2000) so I have been looking for some 2nd hand headlight with that look
to replace the older chrome style headlights that was standard in the -99 Rangie.
It showed that headlights are rare on the 2nd hand market left hand drive version
even more so nd black trim left hand drive versions was virtually non existent on the
2nd hand scene.
And new ones feels a bit on the expensive side for a old car, a cheap skate as I'm :0)
Well one day I had both my headlights on the table, taken out for the HID bulb
kit installation that you can read about at a nother place on this page.
I looked at my headlights and thought maybe, just maybe it would be possible
to take the glass of and modify them to look like the post 2000 black trim headlights.
Did I have any success with my atempt? - Yes!
Did I learn anything that you can learn from? - Yes!
The Range Rover P38 headlight trim modification
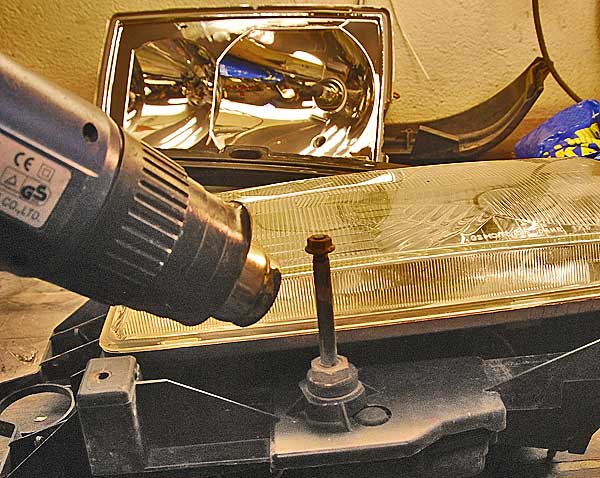 |
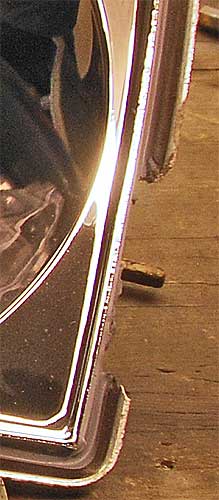
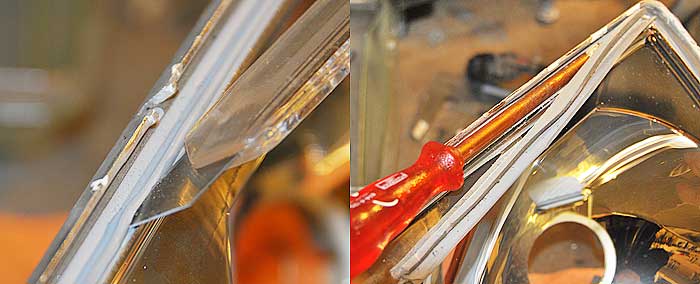
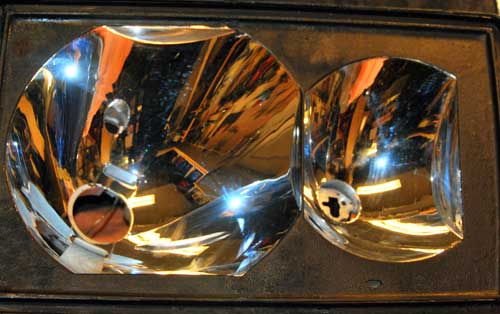
Step 1 Use a heatgun around the edge of the glass to soften the sealant that is used to hold the glass and reflector You need to get it hot enough to soften the sealant but not to hot since then the reflector body that is made of plastics starts to melt :0} When you feel ready to make a glass removal attempts, use a wide blade screwdriver - insert it between the edge of the glass and the reflector and gently twist the screwdriver if you have used to little or to much heat or to much twisting power you might end up damaging the reflector body edge. I did that on one of the edges until I got hang of it! |
|
 |
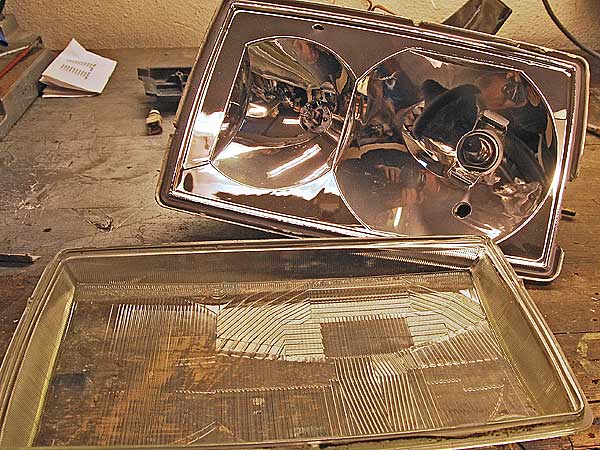 |
Glass and reflector separated The glass came off clean and without any of the sealant left on the edges. In the reflector part most of the sealant stayed in the slotted part that was mating the glass edge. The sealant looks like a packing but isn't. The old sealant will be removed to make space for some fresh smack when it is time for re-assembling |
 |
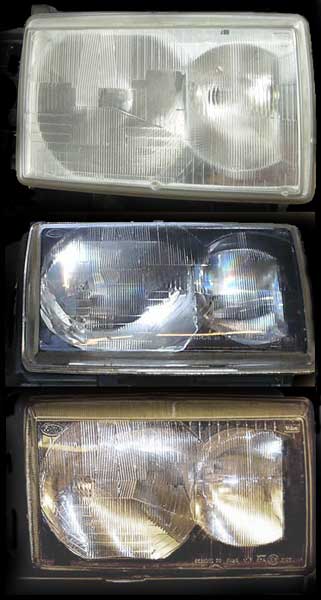
Left image:
|
 My reflectors, black mask painted and ready for re-assembling. |
With the reflector exposed there is now several options for modifications. You can make a black mask from any suitable black material and mount it on top or like I did paint the surrounding parts of the reflector flat black. I used flat black heat proof spray paint that I sprayed out in a small jar and then painted with a small soft brush for better control. When the paint got half dry i used a small foam roller to get a velvet like finish. |
I tried to use masking tape to keep the paint from the part of the reflector
that suppose to stay shiny .......don't do that (learn from my mistake AGAIN!).
The chrome plating came off when I removed the masking tape :0!
Lucky me, I made a test on a part of the reflector that I intended to paint black
so no damage caused to any important part of my reflectors.
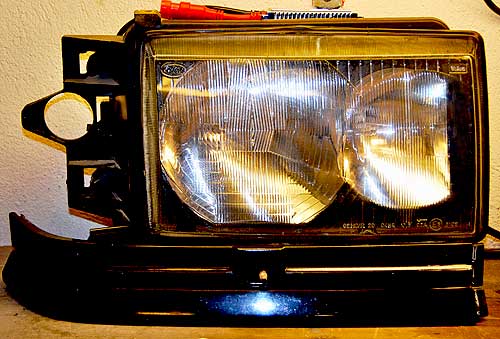 |
Left image: My headlight unit after surgery. The red thing on top of the light is one of the connectors of my HID kit ballasts. I'm happy with the result, looks exactly like the real thing :0) |
I used black PU sealant to seal and merge the glass and reflector again, the same
sealant was used to buildup a new edge at the place where it was damaged during
the glass removal.
I used aluminum tape to hold the sealant in place until it was cured.
Make sure the reflectors are clean and dust free before putting the glass back, and
be careful if you need to clean it since the reflector coating is delicate and easy to damage .

 |
Left top image: My headlight unit again, now modified |
My Range Rover p38 is a 4.6L V8 powered heavy beast that likes fuel
a whole lot even thought it has the latest engine developed for the P38
series of Rangie's the Thor engine. Anything that can be done to keep
the fuel consumption down would be wellcome.
I have now bought a set of Halo spark plugs Part number B-LR17YC
from a e-bay shop. And a set of Magnecore KV85 ignition leads just to
find out if it is possible to reduce the consumption, if I could gain just
a bit it would be welcome.
My previous car, a BMW 540 -1995 Touring was also kind a heavy fuel
user since it also was equipped with a V8 engine and during my years
with that car I was trying to get it to run a bit more economical and one
of the things I tried with success was a new type of spark plugs.
At least they where new to me in 1999, the HALO sparkplug's by Brisk.
The Halo sparkplug's was advertised to produce a better spark, produce
cleaner combustion and reduce fuel consumption and is also rated for
150 000Km change intervals and that alone was a reason to try them.
When you convert to Halo plugs you should be aware that the ignition
timing need to be adjusted due to a faster light up characteristic of the
Halo plugs compared to the standard plugs the suppose to replace.
Depending of how the engine management system works this
can ither be done automaticly/adaptive by the ECU or manually.
My BMW did this by it self since it had a modern Motronic ECU and my Thor
engine equiped P38 will also do soo since it uses a Motronic ECU to :0)
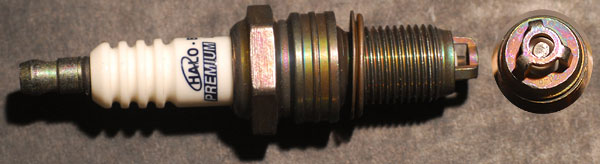
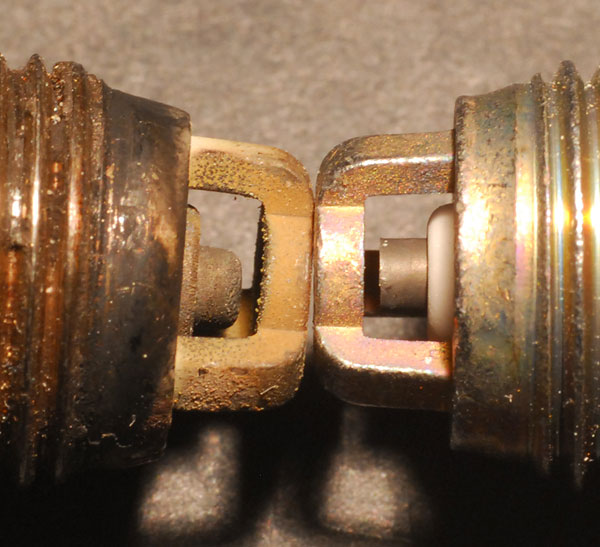
The Halo spark plugs has a circular ground electrode that allows the spark
to travel faster and straighter in to the combustion chamber, this design they
share with igniters that are used in aircraft turbine engines.
|
The plug to the left was removed from my
|
|
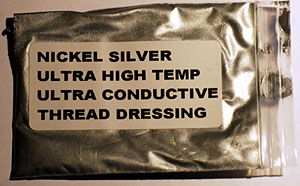
The box |
|
With my plugs came a plastic bag of High temp conductive thread lube that will help to ensure you get those plug out again after the extended life period of the Halo plugs. |

I have read a lot of possitive things about I found dcdezign.com to have the best |

I will report back below when I have some real life tests done with this
ignition setup and keep reporting my impressions over time of use.
First impressions: I just came back from the garage and I must say when I first fired
up my Rangie after the spark plug and cable change (Magnecor red + Halo plugs) I
listened to my engine and could immediately hear a much smoother idling. I also got
the impression of better response on acceleration but that I'm not sure of.
Yes I know and I agree with you, I bought this stuff and of course every time you spend a bit of time with your car in the garage if only to change the engine oil you feel that the car runs much better but still it idles smooooth right now!
I cant tell if it was the leads or the plugs just that I feel satisfied right now I know
that the leads and plugs are new and that they works as good as the old ones and
probably a bit better ;0) anyhow It will not be necessary to mess around with this system for another 10000km unless anything unpredictable happens, and that alone
makes me happy :0)
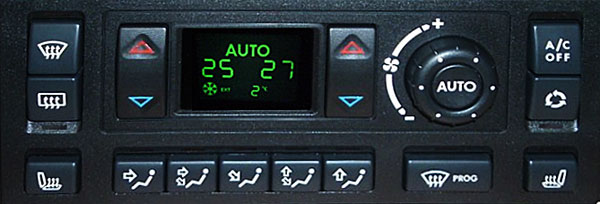
The HEVAC "Heating ventilation and air condition" system of the Range Rover p38
might be the most infamous and annoying system of this car, so let me tell you
how I solved my problem with this system.My HEVAC problem is now solved it started and ended up like this.
One sunny day the darn book and question mark showed there ugly faces.
For the RR owner with a fat wallet this is the sign to bring the Rangie to the
dealer for service and a chance to get rid of some cash.
For me it means trouble, work and a challenge!
It is possible to troubleshoot this system without a diagnostic device but it
isn't easy. I ended up buying a system from blackbox solutions with the name
FAULTMATE MSV-2 extreme.
However I will make a list and suggestion for how to troubleshoot this system
without a such device later in this write-up but for now I will tell you how the
trouble started and how it was solved.
I started to search internet for a solution and most of the time it ended up with a
suggestion to do fault isolation on the blend servos or distribution/blend motors.
(The actuators that manage and controls the distribution of conditioned air in the cabin)
I now started to check all connectors, cleaned all the connectors and reasembled
the system.
It started to work....for...a wile but the darn book and ? mark came back again :0(
However the summer eventually ended and the winter came so I didn't bother that
much about the A/C not working, BUT BUT now things started to get wierd.
I went for a ride up to hour small cabin in the northern parts of Sweden when the A/C
part of the HEVAC started to work more then enough,(Read all the time) and the car started
to reach freezing temperatures inside, I can assure you it wasn't pleasant!
When I during the journey made some random troubleshooting I found out that the
A/C compressor never cut out and the tubes by the compressor iced up heavily.
This also probably caused the whole heat/cooling pack to completely ice up and block
the air flow in the HEVAC system completely (There was no flow att all from the outlets).
I had no time to continue the fault isolation during this tour witch was a pain.
But when I came home I started to get to the kernel of the poodle partly by hints
from the holy internet and partly from my new toy the Faultmate.
This is wat I found out.
The previous owner had tampered with the system by himself and
implemented a fault in to the system by shimming the clutch to tight.
I found this out by removing the relay that was suppose to be closed to engage
the clutch, when I did the compressor was still driven!
This made the compressor to run all the time despite deactivated electricaly
by the control system.The previous owner or his second class workshop probably did that because the A/C
didn't deliver cold air in the summer because of low pressure/gas level in the system.
When I removed the shim I got another fault due to the low press switch didn't
allow the clutch to engage.A gas fill up solved this problem and everything worked fine for a wile.....
... this time my fault isolation and conclutions from the suggestions from the net
led me to the HEVAC control unit.Now I got a new HEVAC control unit witch was shown to be of the wrong type/part
number for my car configuration. It was intended for cars with an outer temp sensor
installed in the air intake duct (The early P38 config) and not in the front bumper area like
in my -99 and cars made there after have it installed this unit had the Part number
AWR5051 so my advice only use this part number on the old config it will give you
a headache otherwise .I now reverted back to my original HEVAC unit witch have the part number
JFC101890 since I suspected that I had changed this unit unnecessary due to
the inaccurate shimmed clutch that fouled me.Now everything worked almost perfect, the only issue was that every time
I started my RR the HEVAC started with a snowflake symbol and displayed
0deg Celsius, I then had to drive for a few minutes and then turn of and
restart the engine to get correct readings, occasionally the problem went away
by itself after a few or more minutes of driving.After investigations it showed up to be a service letter available for this particular
problem, this service letter stated that a programing error in the HEVAC chip is the
cause to wy the HEVAC control panel nead some time to get awake hmm mm..I got another HEVAC control unit from ebay, this time of the very latest version
intended for P38's this one has the part number JFC102550if you like me have a
car equipped with heated seats.
Viola it works :0)
At least for now :0/
More about the HEVAC system
shrike0064 at the Blackbox-solution forum for FaultMate owners has found a solution
incase you want to use the early version of the HEVAC control panel for your post -99
or auxiliary relay modified P38, he permitted me to mirror his hack on this page to
allow all P38 owners to take part of his discover :0)"I am trying to use a climate control out of a 97 Range Rover in my 2002 Range
Rover HSE. (Supercharged) There is a difference between post 98 and 98 and newer
climate controls.Turns out that the climate control measures the current on the compressor control line.
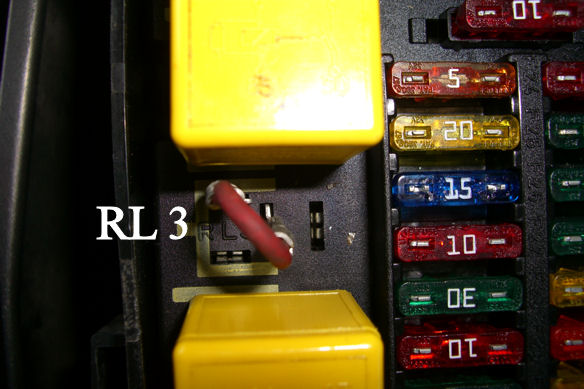
That's how it can tell if there is an open or a short.Climate controls for PRE-98 control the compressor clutch directly. No relay. (RL 3).
The climate control used in 1998 to 2002 use a relay to control the clutch.
The relay uses much less current to control.If you get a climate control that is pre 98 to use in your 98 and newer range rover, then jumper
around RL-3. It will then work. See picture.If you get a climate control that is 98 and newer to use in your pre-98 range rover,
then you MUST install a relay or you'll destroy the climate control. The clutch must be
powered by 12v from other than the climate control line.
In conclusion, it's best to get the correct climate control unit for your year model.
But, you can make any of them work.Charlie"
My comment to this hack is..
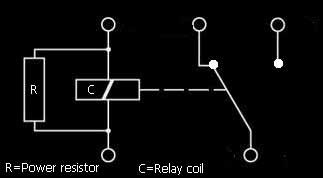
To further improve this hack I would suggest that a power resistor with a resistance
close to or the same as the resistance value of the magnetic clutch coil could be
connected a cross the RL3 relay coil to fool the HEVAC control unit to believe it
powers the magnetic clutch directly.
This tweak would let you benefit from the modification/LR3 relay in the matter of a
shorter wiring path for the power to the magnetic clutch and hereby reduce the
voltage drop, and still be able to use the older type control panel.
I will get back with more information regarding this when I get the chance to measure
clutch coil resistance.
The blend motors are another common source of failure in this system.
Sometimes due to sticky blend doors and sometimes due to the actuator servo motor
also called blend motor.
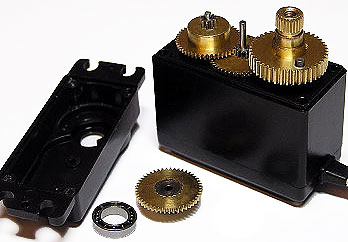
The heater blend motor assemblies contain a DC motor a gearbox and a position
feedback potentiometer.
To diagnose and examine the blend motor assy it is easiest to remove it from the car
and take it apart, when this is done just remove the two white gears and lift out the
circuit board that holds the motor and potentiometer.
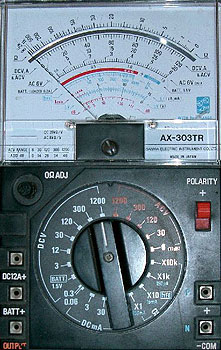
Use a multimeter (or even better an old fashion meter with needle and scale) to check the
potentiometer for condition by measuring the resistance while slowly moving the
potentiometer wiper through the whole register the value should smoothly change its
value without any large jumps.
Use a 12v DC source to check the DC motor and make sure it spins fine.
Connect and remove the power several times to make sure all windings in the
motor anchor is OK also change polarity to reverse direction a few times "just in case".
If no fault is found reassemble the blend motor and perform troubleshooting on wiring
between motor and HEVAC control panel.
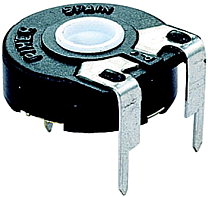
In case of faulty potentiometer, unsolder the potentiometer and replace it.
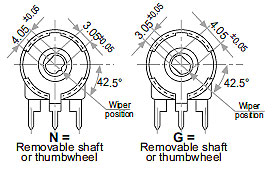
It is a 10K linear trim potentiometer PHIER PT 15NV is the type.
Conrad P/N 432024 - 89. Wiper position preferably like in the G version
but not critical . This potentiometer comes in two different versions, one
that are rated for 500 cycles and one that is suppose to be good for
10000 cycles. (Not hard to guess witch one Land Rover uses, huuu). Get the Long Life version
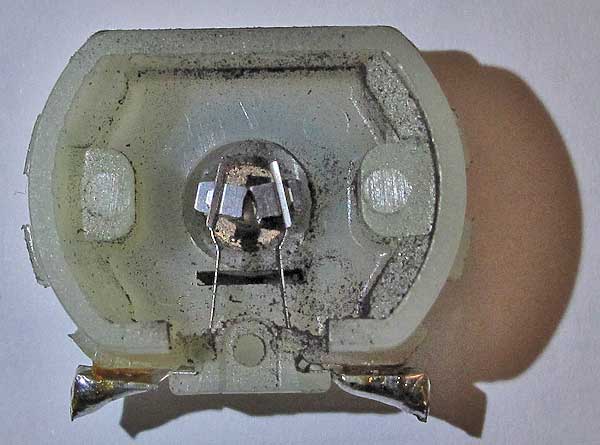
if you intend to replace yours .UPDATE!
I got an e-mail from a Norwegian guy named Alfred Lervåg that
reports that he recently replaced his blend motors with brand new
units that only lasted for 2 month until they started to misbehave!
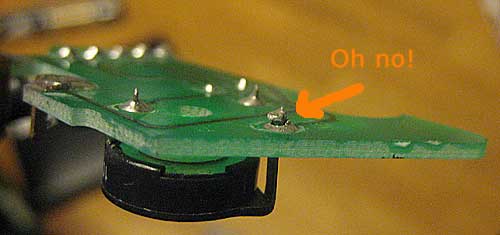
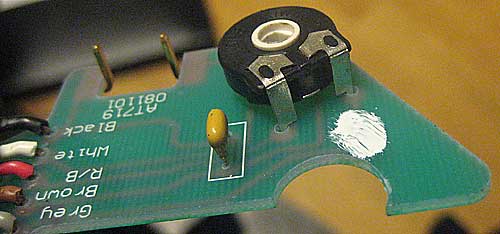
During further investigation and trouble shooting he found a bad
solder joint at the position feedback potentiometers.
It looked like this:
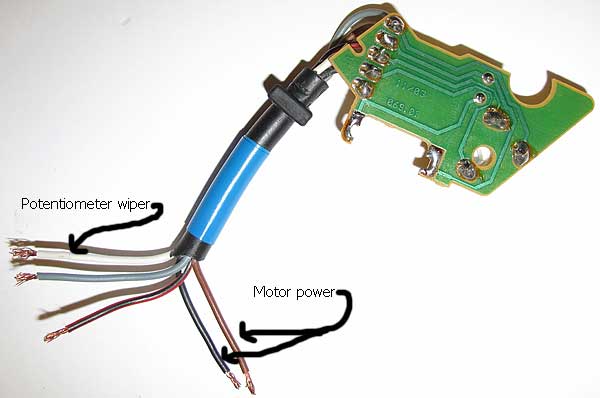
The three wires in the lower right corner red/black, gray and white are connected
to the potentiometer, the white one is for the wiper.
The other two are for the DC motor (brown and black).
Since my FaultMate diagnostic unit told me that the right hand blend motor was
faulty I just removed that one, I decided that it was easier to just cut the wires to
remove it and splice it back in when overhauled.
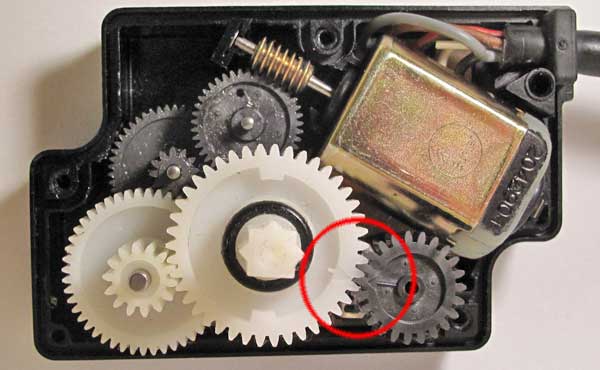
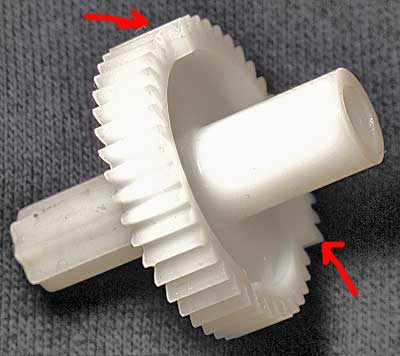
When you reassemble the blend motor, with its original parts make sure to get the
markings on the big white gear to meet the marking on the potentiometer gear.
If you replaced the potentiometer and didn't get the one with correct wiper/gear
position just make sure the white gear is centered at it's widest part against the
other white gear, then tune the potentiometer to middle position and thereafter
install the potentiometer feedback gear without taking care about markings.
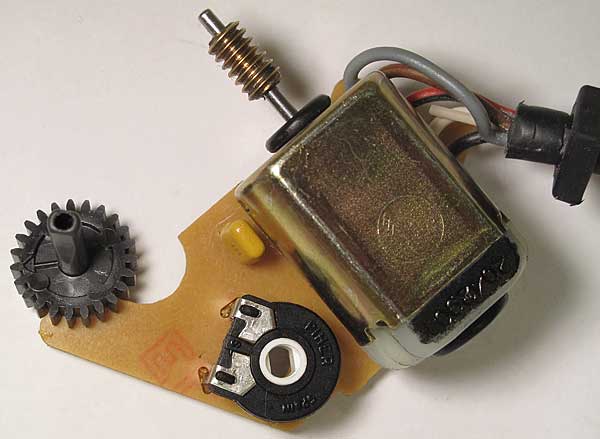
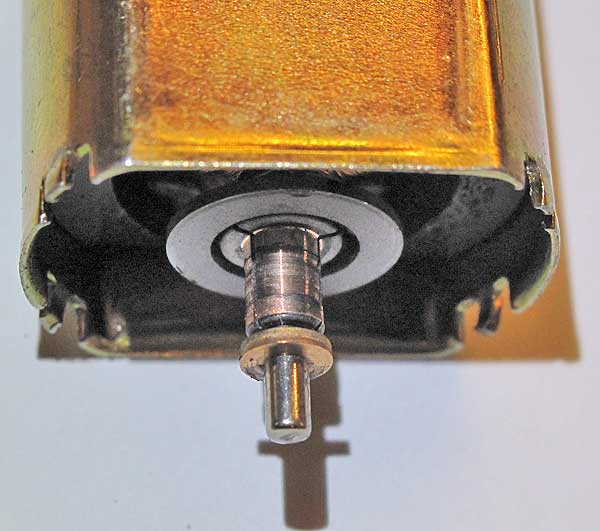
If the DC motor parts looks like this and the motor spins just fine then it
is just fine. However sometimes the carbon brushes are more worn, if that is
the case it might help
to use a small file to trim the brushes to remove the sharp edges at the end of the
arc shape. Also carefully and slightly adjust the springs.
The round collector can be cleaned with a very fine sandpaper (Wet grinding paper)
and thereafter with pure alcohol to remove grease.
On board Range Rover P38 blend motor and feedback circuit health check
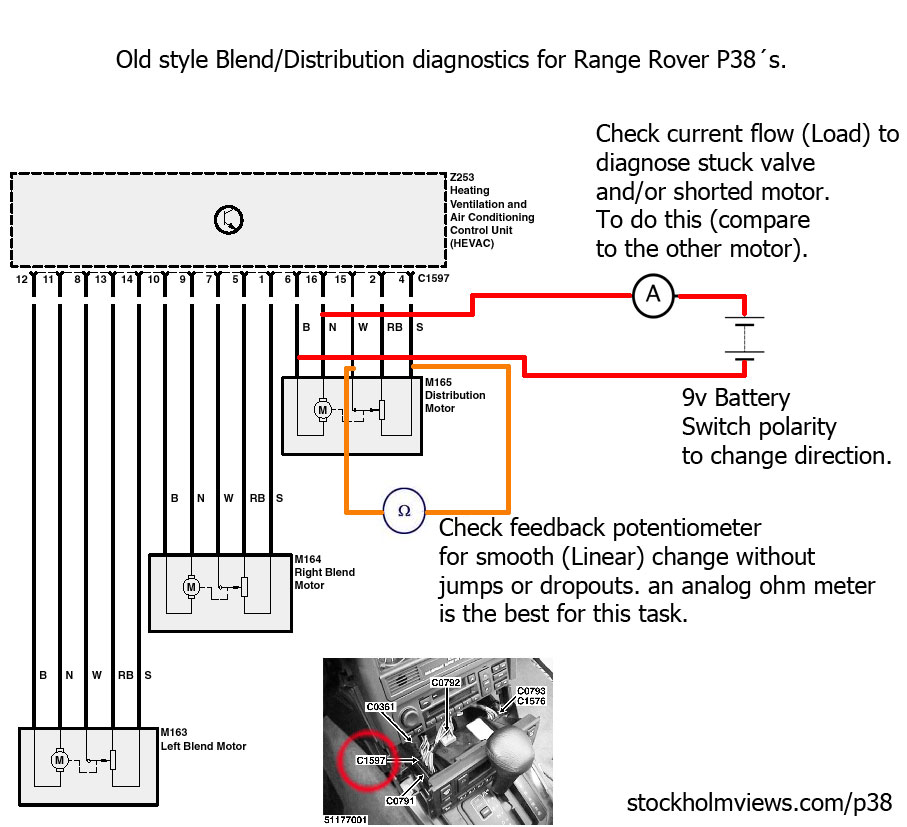
The image above shows an example of how you can perform a health check of the Range Rover P38´s blend and distribution servo motors with some simple electronic instruments.
To get access to the blend/distribution motor connector you need to remove the HEVAC control panel (Find out how in the RAVE manual). On the actual connector you can now find markings for pin 1 and 16 (molded in the plastic connector body) and you can start to find the hook up points for the motor assembly that you want to diagnose.
To start with you can run the motor in both directions to find out if it can move at all.
You can monitor the movement by measuring the resistance (Ohm) of the position feedback potentiometer at the same time as you run the motor from a 9v battery (Or other power source 9-12v) change direction as son as you reach the mechanical end stop*.
Measuring the current load (Ampere) will help you to find out if the valve is sticky or hard to move since when the motor get loaded by high friction or get stuck the current will increase.
The position feedback potentiometer can also be checked this way in this example (The Dist motor) first measure the value between pin 2 and 4 it should be 10khom then put the ohm meter between pin 2 (or 4) and pin 15 then run the motor several times from end to end by shifting the polarity of the power source at pin 6 and 16 at the same time as you monitor the ohm meter, make sure the value changes smoothly without jumps or dropouts.
An analogue ohm meter with dial and arm is best for this task since it is easier to monitor.
So what should the values read then?
The easy answer is there are 3 identical units in the P38 so just simply measure the other once to and compare with them that works!

|
|
| Best for precise reading of values and in this case current (Motor load). | Best for reading of smooth changes of the measured value like the potentiometer value of the feedback circuit. |
*A small WARNING! when you run the servo motor directly from a power source this way you will run it against a mechanical stop at the end, keep your attention on this and remove the power source as son as you reach the mechanical stop or you might damage the motor!
During my work with the blender motor on my Range Rover P38 I have been amazed
over the low quality of the hardware used in those "Blend Motors" I have now started
to consider other options to the stock servo blender motors.
I recently bought four strong high torque MG995 metal geared servos made for
radio controlled toys from e-bay, those are both cheap and seams to have higher
built quality than the RR blend motors!
30 usd including free world wide shipping was what I paid for those four servos.
I bout them to build a tilt and pan head for a WIFI Yagi antenna and when I modified
my servos for full rotation I realized that those servos could be used to replace the
blend motors in my Range Rover P38 as well. The motor already contains a feedback
potentiometer and everything.
The MG995 half naked.
However if the potentiometer value is the right one for the HEVAC I don't know but in
the future I will try to find out both the value of that pot and if it is wrong I will try to
find a replacement. I will also examine if the voltage from the HEVAC is suitable to
drive the MG995 servodirectly or if I have to make some modifications.
And finally I have to get the output shaft to fit the blend door shaft and to make a bracket
for the servo so that it fits the blend motor mount point.
Keep an eye on this space for future updates!
|
|
My first breakdown came after about 6 months ownership (Its a 1999 and I got it in 2009)
on my way back home from work I got that damn "Slow 35mph and EAS symbol"
on my dash, however I didn't noticed any exceptional change in drive ability
except for the fact that the height of the car become static.
When I checked the fuses I found one of the fuses for the EAS system was blown.
I tried to renew the fuse but it went of at once :0(
By reading the wiring in the RAVE manual (Widely available for download on the web) and by
the use of a multimeter I found the valve block driver to be shorted.
I got a new valve block driver from the amazing Ebayand it worked just great again.
My 2nd breakdown came at a much more inconvenient situation and was of a different
character. We were on a tour up to our cabin in northern Sweden "Kittelfjäll" when the
damn 35mph max and EAS symbol showed us there ugly faces again, shortly after
we were riding on the rubber bumb stops and I can assure you that doing so isn't
particularly comfy :0(
The good thing was that we only had about 10km (6 miles) to go until we reached the
our cabin, the bad thing was that the local Land Rover shop was about 350km away
and that we where 900km from home base.
Fortunately and ass usual when I go for a longer drive I brought my computer and my
diagnostic equipment with me. I was able to reset the fault ("R/H aft solenoid valve permanently
closed") and get the EAS compressor running again.
The compressor struggled to get my precious P38 to raise so now I started to look for
leaks, I found the problem almost at once.
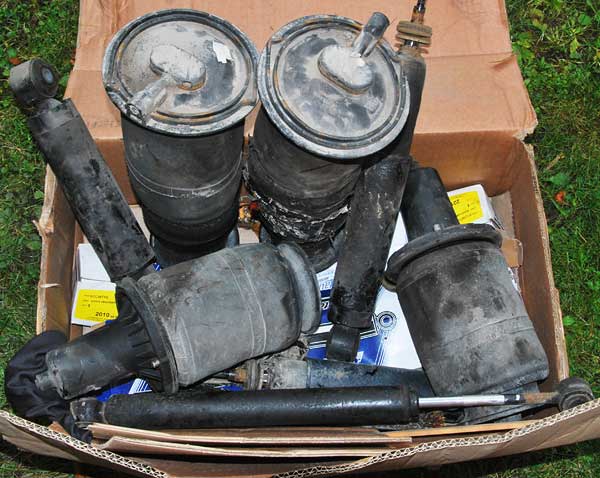
I must admit that I should have inspected the air springs a long time ago and
probably at the time I bought the car but I did' t so I learned the hard way.
The pictures of worn out air springs found at rangerovers.net does in fact look
like new compared to my R/H aft unit, however and surprisingly the other tree units
on my car looks quite alright!
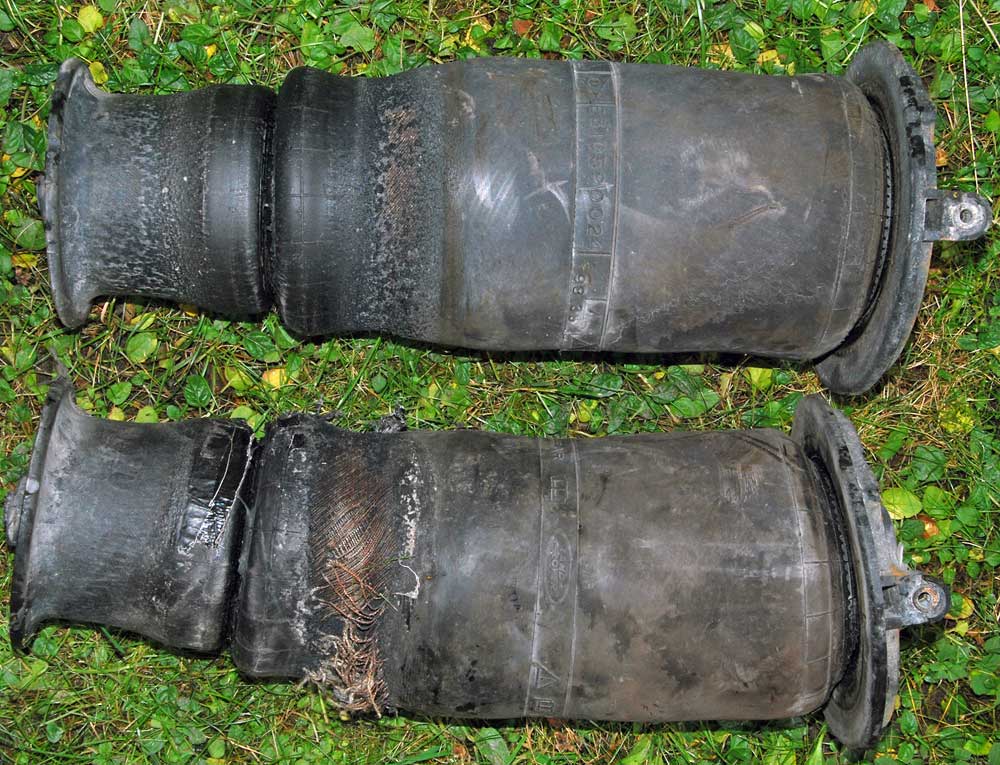
Above: The upper air suspension spring/bag comes from the left side of my P38
they and still works OK, however it is due for replacement since it has been sitting
there for about 11years by now
and are singing it's last song and I wouldn't fancy driving on the bump stops ever
again :0)
The lower air spring was the one that started to leak (Can't imagine why :-} )
You can spot traces of my war repair, duct tape and rubber sealant.
The aft right air spring bellow was completely worn out and a small puncture had
occurred , this could easily be heard standing behind the car. I crawled under neat
the car and examined the damage hereafter I decided to transform myself to MacGyver
just to be able to bring the car back to home base Stockholm for a proper repair.
I went to the local store "Sista Utposten" in Kittelfjäll to get the necessary stuff
I bought some duct tapeand a tube of "LiquiSole" shoe repair rubber glue/sealant

and then I headed back to the cabin for Range Rover p38 surgery.
The car was put on a jack on the aft right corner and jacked until the air spring was
stretched at its maximum, I did this with the engine and EAS compressor running to
make the other three corner to follow, when this was done I turned of the engine
and compressor to let the air out of the leaking bladder to allow the sealant to stay
in place over the hole and not blow away.
When this was done I was applying sealant (LiquiSole) over the hole/puncture and
the area around it, no reason to be shy I thought so I used the whole tube of sealant.
Gravity tends to dislocate the sealant until it cured so I used some duct tape to hold
it in place, the duct tape also helps to reinforce the repair and to protect it from wear.
Now I had to wait for about 24 hours for the sealant to cure, when that period had
passed I held my breath and made a test.
It worked! And a few days later we was heading home and everything was working
just fine for 650km's (400miles) then the "35mph max" showed and we where on the
bump stops again, I then left the highway in to a smaller road so I could stop the car.
I hooked up myagain and was able to get it working again, the leak was
there but the compressor managed to keep it level for the rest of the journey.
When I came home I ordered some parts for my car for repair and for upgrading.
- A full set of Arnott Gen III
- A full set of new shocks (Installed)(Standard OEM Boge shocks)
- A set of 30mm wheel spacer (Installed and looks nice, Just to cheer my self up :0)
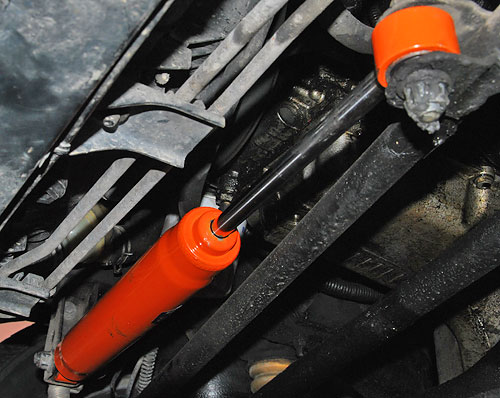
- A new steering damper (Installed)
- An emergency airing system for the EAS system (Installed)(Just in case of compressor
or electronics failure) - Xenon HID headlight KIT (Se below)
- Some loud speaker units (Installed)(Se further below)
- A Propshaft Rubber Coupling Yoke (just in case)
- A Remote Alarm FULL Keyfob Repair Kit
(since my remote key could have been working better)
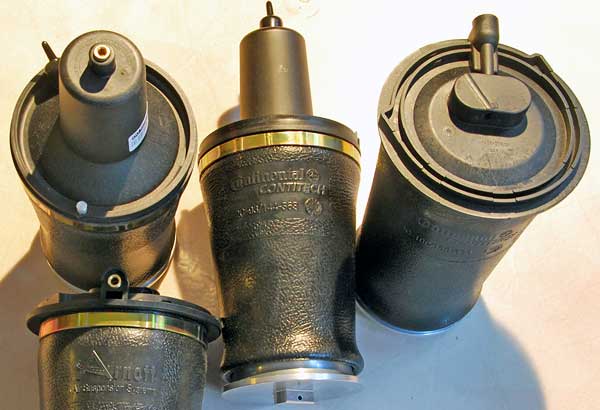 |
The new pillows for my P38 flying carpet, the famous Arnott Gen III The Rolls
Royce of aftermarket air springs. The actual bladder is made by Continental/
Contitech and caries the Part number 2C-100/150-390 in the back and
2C-93/144-363 in the front.
The bags looks and feels different compared to the originals, they are made
of a thinner material and also both looks and feels more synthetic compared to
the old ones that looks to be made of rubber. This is probably good news since the
synthetic material should be more age and ultraviolet light resistant and here by
having a longer life.
Those bags are crimped to the end pieces, the lower part is made from fancy
aluminum and the upper part of glass reinforced high tech plastics (Similar to the originals)
the crimping ensures that no leaks occurs by the joints and also prevent the bladder
from leaving its seat (In case of extreme suspension movements)
Read here about how to replace air springs and dampers.
Arnott Gen III Forward spring manual
Arnott Gen III Forward spring manual
Arnott general air spring removal manual
Since I had removed the air compressor and valve block I found out that
using a foot pump for bicycles I could connect it directly over the air tubes
in the engine compartment.
This way I managed to pressurize the air springs enough to lift the car just
slightly and then perform a leak check with soap water before I put the wheel
arc liners and wheels back again.Since the wheels was off and I was crawling under the car I replaced the dampers to,
just to have it done. After consulting multiple forums on the I-net I went for BOGE
dampers that is suppose to be same as the originals (BOGE is a large OEM parts supplier for several
large car producers) the part numbers are for the front 35-342-0 and back 35-343-0
Ref:http://webcat-services.zf.com The BOGE dampers are good quality at a nice price.
Lot of people recommends Bilstein GAS dampers for there excellent performance and
ability to improve the Range Rover road handling read this like "Stiff".
I'm not considering the RR P38 to be a competition car that suppose to be quick
around the corners but a car that should have a smoooooth and almost fluent ride.
A ride that by many is described like a flying carpet feeling, I want that so I stay
with the original damper design rather than some expensive fancy dampers that
make the car uncomfortable, I actually read in a forum thread about a guy that got
tired of his Bilstein's and reverted back to originals to get the comfort back!
Nice things to have when you intend to replace dampers and air springs is

- 18 and 17mm ring ratchet wrenches (Saves time and 18mm isn't in every ones toolbox).
- 18 and 17mm ring/u wrenches
- Some regular tools like screwdrivers etc.
- A set of garage stands (For your safety).
- A extra long needle nose pliers (It is hard to get to the aft air spring airline connectors without).
- Good movable light source (It is dark down under).
- A crowbar (Old bags at the back end of my car had to be convinced to get out).
- A stiff brush (To clean of all the dirt with)
- A good foot bicycle pump (This was the perfect tool for individual leak check of the air springs)
- Lots of time an patience this isn't a difficult task but you never know
Mr Murphy might be there!
Old suspension parts that I didn't had to hard |
|
The new steering |
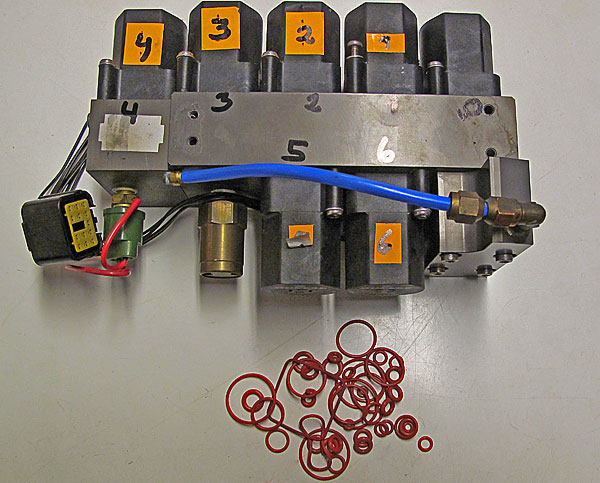
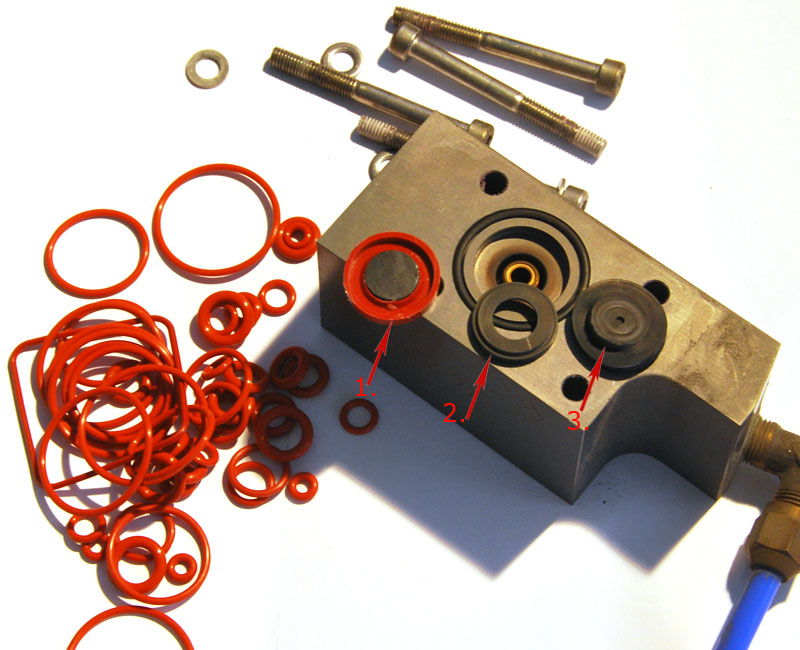
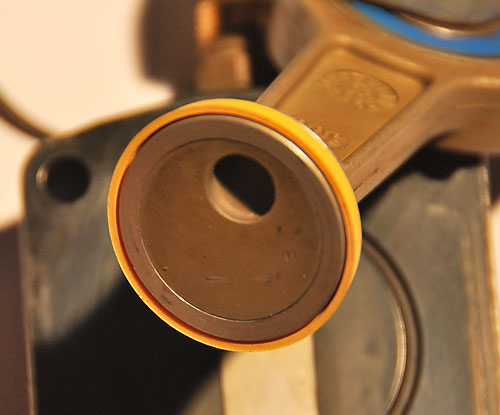
Like I mentioned before, I found out that the valve block had a leak from the air
exhaust port so now it is time for surgery of the valve block!
 |
The leaking valve
|
 |
As you can see the Leaks is easy do diagnose, just pour |
|
 |
Since my brake down came at a |
  |
The compressor seal kit that I got
|
  |
To the left you can see the result
|
In short, the EAS air compressor repair is an easy task that a Range Rover P38
owner with a normal portion of handyman in himself would be able to perform.
However some care and attention is needed to be sure not to damage the new
seal, READ THE INSTRUCTIONS!
From ebay you can get various models of emergency pressurization systems for the
Range Rover P38 Air suspension system (EAS) the system I went for cost me 76GBP
including shipping I find that to be a cheap insurance that will take me home in case
of a compressor or electronic failure in the EAS system.
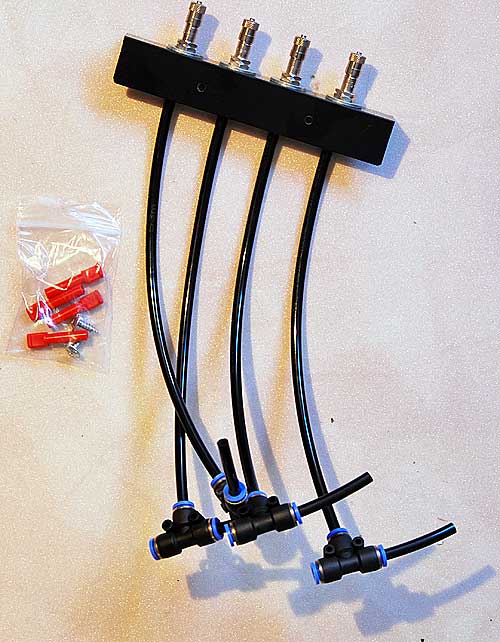 |
This is how the system I bought
Installation time?
|
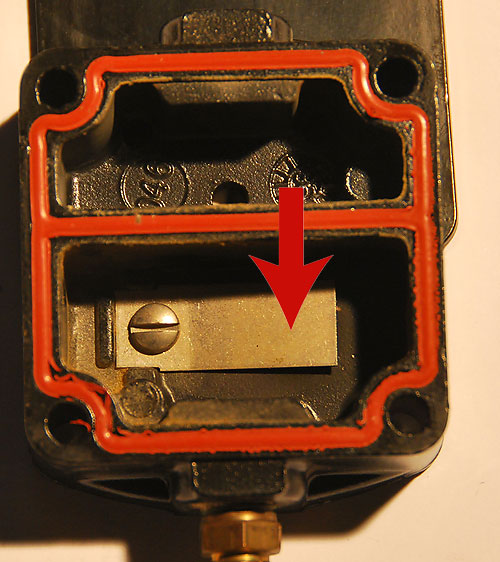
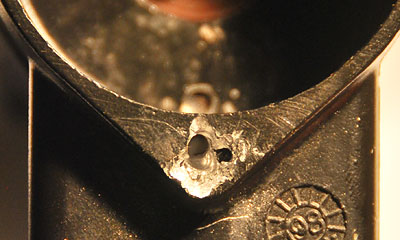
During the leak check that I performed after installation of the emergency airing
system I found a leak in the EAS valve block :0(
Bubbles developed from the air exhaust muffler, It appears to be the infamous
valve block diaphragm valve that have cracked and started to leak.
An easy thing to repair but a bit time consuming, find out how to do it here.
A few more things in regards of EAS system fault isolation.
If your only problem is the EAS system and you find the Faultmate system to be out
of your range due to the relatively high price (However cheep if you compare to other full
diagnostic systems for LR/RR) there is a DIY + Freeware solution called EAS Unlock Suite
developed by rswsolutions.com.
The company rswsolutions also make various unlock and maintenance tools for
other Land rover Models than the P38 and also for other systems than the EAS
And they are continuous developing more useful software and tools for us DIY RR/LR
owners.
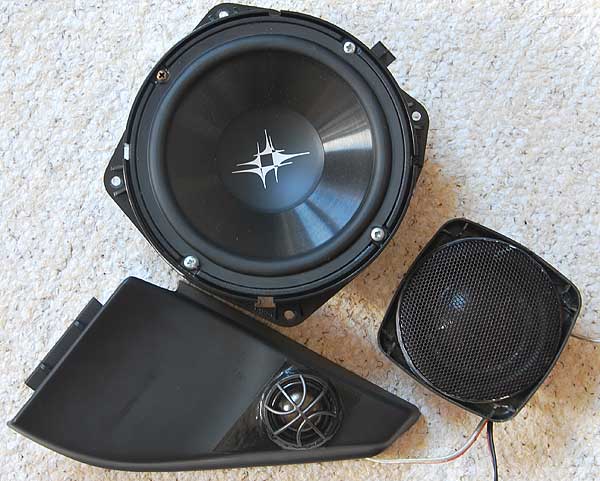
To start with I must say that I find it to be a mystery that Harman Kardon put
their badge and name on this lousy sounding speaker system!
I decided to change the speakers for something else and try to keep the head unit
and amps to start with, however if the sound still not improve as much as I want it
I might reconsider and perform further upgrades in the future.
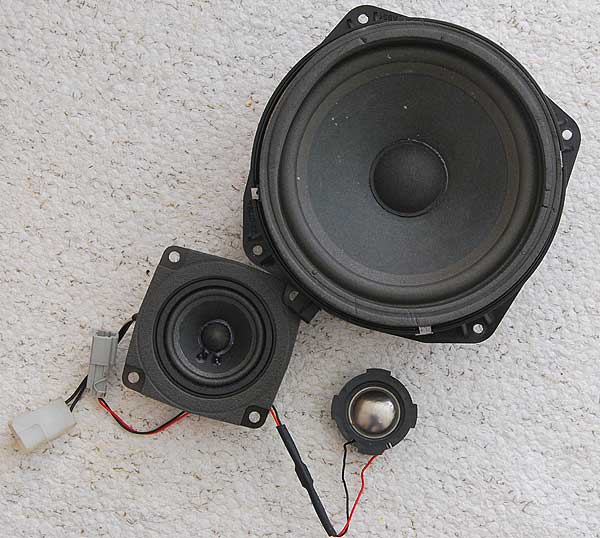 |
To the left the front Three speakers in |
Looking the business, don't you think so too :0) |
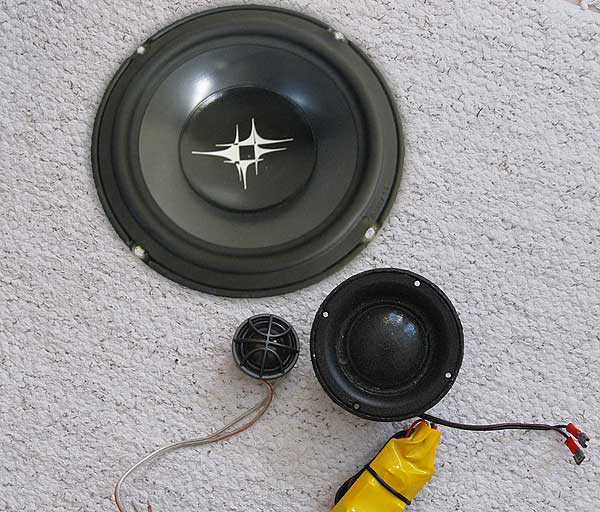
The new gear! |
The door amplifiers in the HK system is a two channel amp with an active x-over
this means that the woofer don't need a passive x-over and neither does the
midrange unit however the tweeter needs one and in the HK system it contains only
a single low quality catalytic capacitor.
The new system that I will install will use the same amps and I will wire the woofer
directly to the amp just like in the original setup. I will also use the adjustable
passive x-over for the new DLS tweeter that was in the box when I bought it.
The DLS midrange could also be connected to the amp directly, but I will not do so
i will use a small passive filter for this unit as well just to cut of some high frequency
information that is covered by the tweeter that does that job better.
|
|

Lets get on with it!
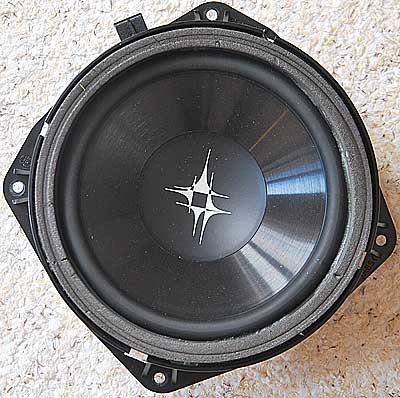
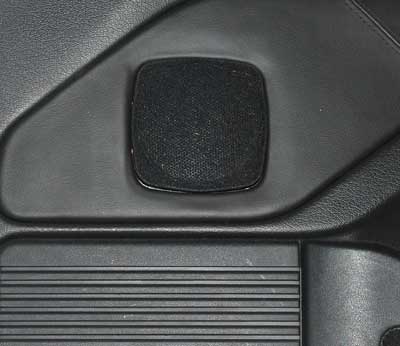
The door woofer is easy to replace, just remove the door liner and then remove the
4 screws that hold the speaker assembly to the door.
Then straighten out the 4 tabs that holds the speaker unit to the mount and remove
it, Some force must be used to do this since the speaker also seams to be additionally attached with a small amount of glue.
Now gently remove the surrounding speaker to door panel foam seal that will be
reused again.
When this is done, just drop in the new unit of your choice (Should have an outer diameter of
about 168mm) Use silicone sealant and/or self tapering screws to attach the new unit.
Now use some contact cement to reattach the foam seal previously removed.
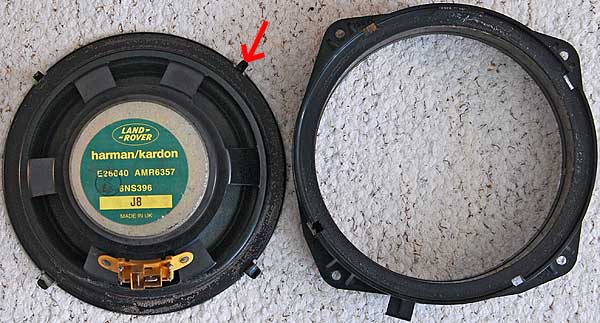 |
<-- The speaker unit removed from the mounting frame. Tabs (red arrow) must be straightened out and some force need to be used to separate the two parts. |
 |
<--
Just make sure to get
|
Polarity check
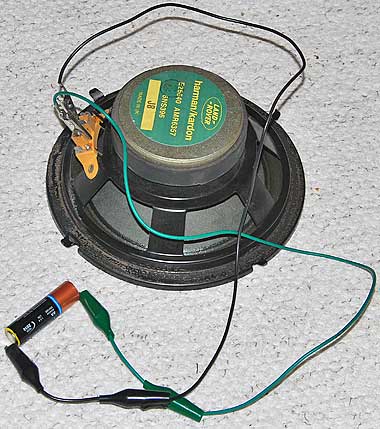 |
When I work with loudspeaker I always use a small 1.5v battery to check for correct polarity/phase, just connect a battery briefly to the loudspeaker unit terminals and watch how it moves, if it moves outwards the polarity is correct. Double check with the removed original units and make sure to connect the new units the same way as the old ones. |
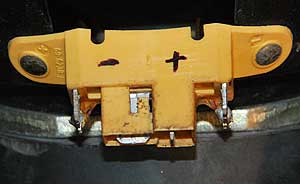 Polarity of the original door woofers. |
The midrange unit and filter
 |
A crappy photo of a nice midrange unit.
|
 |
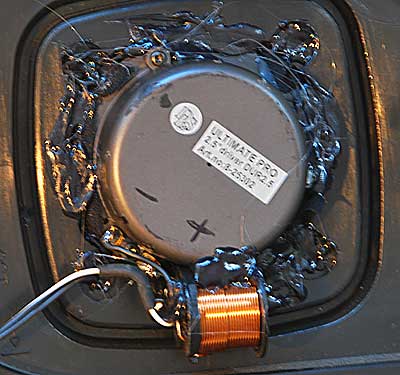
<-- The new woofer in its mount without the edge seal. Midrange unit squeezed in to the original mount that is turned inside out and slightly modified with the can't live without Dremel Tool The DLS tweeter installed at its original position but in a modified way for the best possible sound quality. |
 |
The midrange unit again, now covered with |
Sound check!
Now the sound is more than acceptable however some fine tuning is still needed and
the trunk mounted subwoofer also screams for a upgrade.......to be continued
Car audio Links
- 3 way component speaker systems on Amazon.com
- www.caraudioforum.com
Specifications for my system
Woofer data |
Midrange data |
Tweeter data |
|
ULTIMATE series Stabilizing steel rings and UR2,5 is included with Specifications |
ULTIMATE series tweeter UP1C is included with MS5A UP1i is comes with UP5i, Specifications |
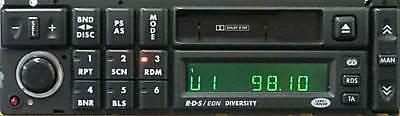

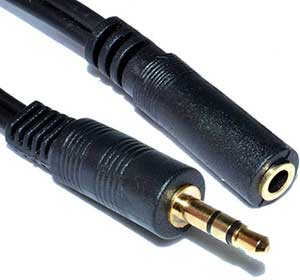
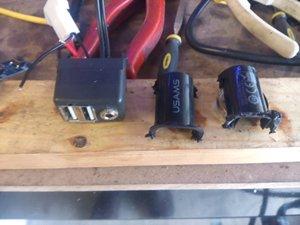
Parts needed, all available cheaply on eBay:
3.5mm jack lead extension (cut off the socket end).
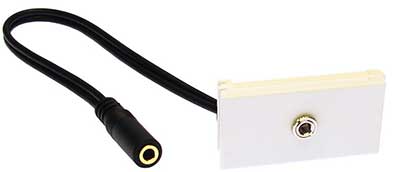
3.5mm faceplate. Unscrew socket from faceplate, dispose faceplate.

Vehicle 12v USB adapter.
Audio filter with 3.5mm jack connections (might not be required but I had alternator hum with aux audio)
The original Aux-In lead is simple to do if you know how to solder and adds that all important Aux-In for modern equipment.
There is a video available online here: http://dzairshop.tv/watch/YrjVtId7_1g/adding-aux-ipod-iphone-interface-into-range-rover-clarion-head-unit-stereo.html
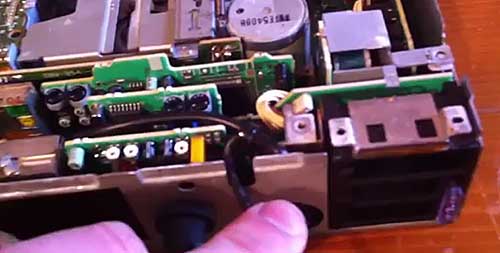
Basically all that is needed is to remove the stereo, remove the top cover and locate the 3rd board as in the picture below.
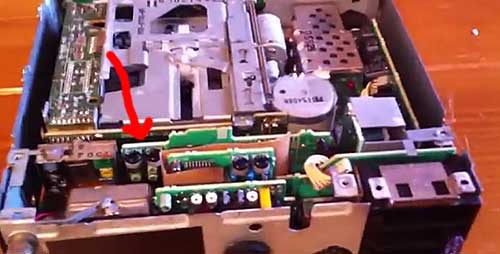

This Board
Once the mini board is removed solder the three wires from your audio jack lead to left three pins on the left hand connection block.
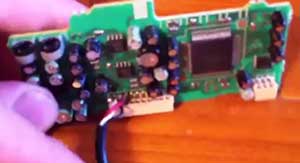
Completed wiring looks like this.
Now pop the modified board back in and route the wire out the back making sure to place a loop or tiewrap inside the radio to act as strain protection.
That's it difficult bit over.
Take the faceplate and unscrew the jack socket from it. Discard the faceplate, bin it, save it, do what you like with it but it is no longer needed for this project. Put this to one side.
Get your USB Adapter and take the apart. I used a dremel to lightly go around the edge and pull the two halves apart. Unsolder the spring which is the + and the side contact, the -. I used a old plug and socket from a R/C model battery to act as a connection and ran the 12v wires down to the cigeratte lighter and used some basic scotch locks.
Use the blank switch (right one next to the light switch on diesels is ideal, otherwise the far left one will do), dremel and file the bottom half of the of the switch blank and drill a hole for the Aux-In at the top half.
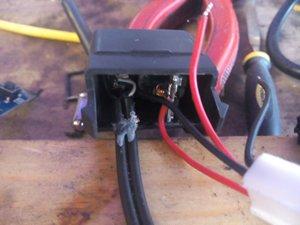

Pop back into the vehicle and connect the Aux-In lead into the ex faceplate socket. (or via the filter if required due to noise). You now have an easy to remove socket in the blank switch. whenever a device is plugged into the Aux-In the radio will cut out and the sound will come out the radio.
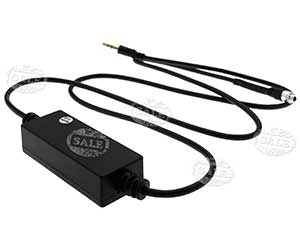
Bluetooth option
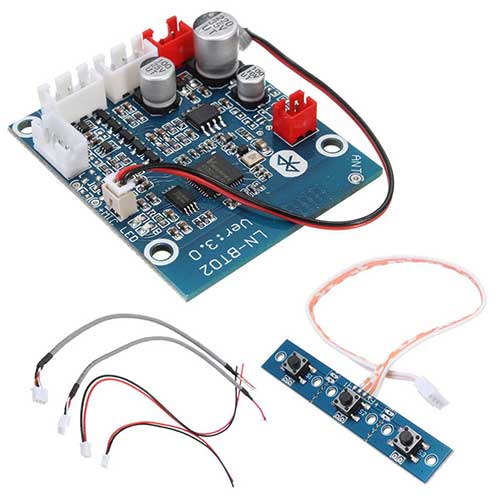
Bits required: LN-BT02 Bluetooth board (check eBay / Alibaba / Amazon, etc.)
Another 3.5mm jack extension lead.
Remove your USB / Aux-In blank switch panel which was created above.
Cut your 3.5mm jack extension lead in half and tin the ends of both halves. The Jack plug needs to be soldered onto the Aux-In lead on the Bluetooth module. The Jack socket needs to be soldered onto the Audio-Out on the Bluetooth module.
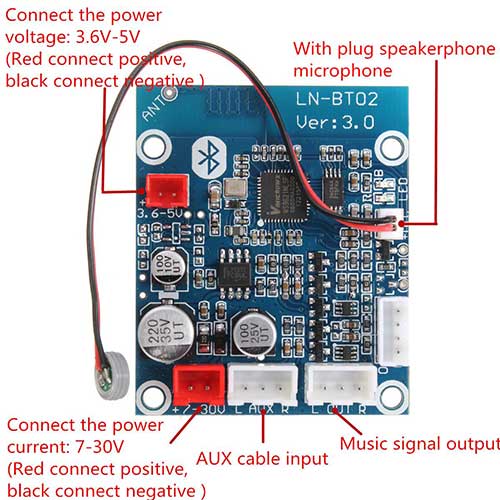
There are 2 x power cables on the Bluetooth Module, you can ignore the 3.6-5v lead but you will need to connect the 7-30v lead to the power cable used for the USB adapter you created in the Aux-In steps above.
The Bluetooth module does come with a microphone but I opted to use an old car kit microphone instead purely for cosmetic reason.
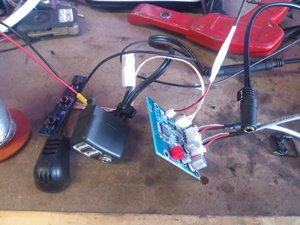
My cable looks like this.
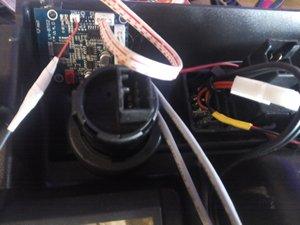
I removed the centre dash and hot glued the bluetooth board to the position just above the back of the lightswitch.
Once the power connection has been made, connect the Jack Plug on the Bluetooth module Aux-In to the old faceplate jack socket now in the blank switch (your Aux-In device connection).
I placed the mic and switches on the top of the centre console for now although I do plan on mounting underneath in the future and connecting 3 x push switches to the convenient solder pads on the switch board.
Replace the dash and while doing so plug the Bluetooth module Audio Out Jack socket and radio Aux-In lead together (or to the audio filter if required and from the filter to the radio Aux-In lead). Plug in the power and now to test.
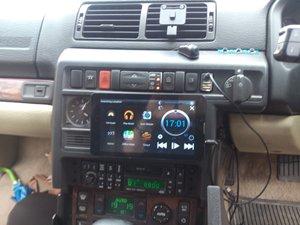
I'm using a tablet connected to the Aux-In via a lead and the audio comes through nice and crisp with no distortion. When switching on the power I also receive a notable tone via the speakers letting me know that the bluetooth module is now powered.
So, my little boy is now watching his moster truck videos in car with the sound coming through the radio and the tablet is also being charged via the USB ports we have created above. My phone can also connect via bluetooth and I have a nice clear car kit. You will need to connect for the first time, no parining code is needed. After that connection is automatic.If I receive or make a call the Aux-In tablet connection is cut off or of course if I choose to play my own music over the bluetooth connection when my boy is not in the car.
I believe this has given me a wide range of options of Aux-In equipment with bluetooth 4.0 connectivity while not worrying about losing the cd changer. If nothing is connected, I hear the radio as normal. Everything is still standard and easily removed if needed.
All by Mark Askew member of the Range Rover P38 group.
Alternative parts and components that can be used on the Range Rover P38
In this section I will list parts from other makes and alternative sources that is
easy to find and might be cheaper than the "LR branded part"
This section continues here [P38 Alternative spares]
Future updates of this page will contain.
When I get some spare time I will add more info to this page.
The first things to write about will be.
How to renovate the distribution motors / servos.
Relays, how to troubleshoot relays in general and HEVAC related in particular.
DIY A/C Gas refill and alternative cheap gases!!
P38 Air suspension troubles and solutions/alternative solutions (Yes I have had my share of this to).
Range Rover P38 Audio upgrade, the easy way and maybe the hard way :0)
Wheels rims and tires, don't make my mistakes, and if you do, how to solve them.
A review of the FAULTMATE MSV-2 EXTREME
I will also put together a list of other useful websites for P38 troubleshooting.
Rgds/Stefan
I'm a Swede that's why :0)
Garage and spare part suply
Resources/manuals/how-to
Magazines
Range Rover P38 websites
Free hosting & domain name. 1000MB and .com or .co.uk domain free for 1 year.
Limited time only. Check www.one.com for more details