
The vehicle electric trouble shooting tips
Information and troubleshooting guide for general car electrical fault
isolation. This guide will help you to do a correct judgment of the
condition of electrical components in a car or other similar vehicles.
To follow this you will need to have basic but not extensive knowledge
of how to read schematics plus common scene and some DIY skills.
|
 Join my Range Rover P38 Group now! |
|

Range Rover P38 Drained battery the final solution
I use my P38 far to seldom and I tend to find it with an empty battery far to often. Not only is this frustrating it is also bad news for the battery the take a lot of beating by being deep cycled frequently.
My solution up to now have been to disconnect the battery every time I expect a long term parking period. This however involves popping the hood open and using a spanner to unhook the + wire.
The new solution is easy to achieve and the end result is what I call the lazy man battery disconnect solution.
The new battery, two 200A 12V relays paralleled with some copper bars, plus the two new battery wires required for this project.
My parts list for this project contains:

- 2x 200A Relay
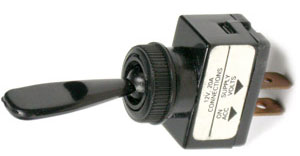
- A toggle switch to control the relay
- Some battery leads and terminal lugs
- Wires to remote control the relays
- Time
- And a new battery since I killed my by deep cycling to often.
I went for a 95A AGM battery this time for better cold weather
and deep cycling performance, It didn't fit my 4.6HSE directly
but it was easy to adjust for it, and the wiring was up for modification anyway.
Schematics is straight forward and easy to follow for anyone.
The switch can be any kind of toggle switch and just have to be able to handle the relay coil load.
Chinese relays two in parallel would be good enough time will show if I was right ;0)
The rating for relays is usually based on the current the should be able to brake, the load performance in closed mode should be much better.There are some drawbacks that you might experience if you use this method but they are the same issues that a regular battery disconnect would cause.


- Sometimes engine disabled shows on the display this is annoying but usually easy to sort by just following the on display instructions.
- Annoying beeps about windows not set, I sorted this by simply disconnect the speaker on the back of the instrument cluster (Red circle) note you will also loose the driving direction light clacker.

The tools I used for this tweak except for the most common ones includes a terminal crimping tool that is used with a hammer and made for the heavy duty terminal lugs that is required for fat battery wires. (Note that some car parts stores also selling ready terminated battery leads in various lengths).
Some additional images.

Relays installed in the drain box behind the battery (Box no longer needed since the AGM battery is sealed.
The battery lid will cover and protect the wiring.

The remote battery switch mounted next to the ignition key switch
just to make it easy to use, the switch could also be placed in a hidden compartment or maybe even a hidden magnetic switch behind a panel to make your vehicle more theft proof!
Relay diagnostics
Relay's is a electrical mechanical component that are used in many
circuits and in the Range Rover P38 there are several installed.
A relay will over time loose some of it's performance and eventually
totally give up its task to deliver or brake the current flow when actuated.
This fault can be easy to diagnose but it can also be almost impossible
if you don't know how to do it. A common mistake is to measure the
contact resistance on a relay with the contacts unloaded. I will now
give you some advises that will help you to do it the right way.
- If you don't have a digital multimeter, get one and don't buy the
cheapest or the most expensive one. You would regret that you
was to cheap when the dinky toy brakes but you don't need the
fancy one either.
- Get some car lamps at different wattage to use as dummy loads.
Get those that can be used with car type crimp contacts or solder
some wires to the lamps and crimp on the contacts to make them
usable.
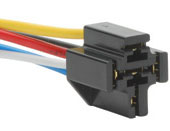
- Buy some relay sockets that fit the type of relay's that you want
to test. Also get a range of car bulbs to use as dummy load.
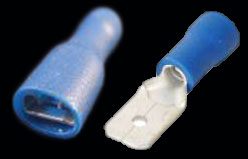
And finally buy some 2.5 mm2 car wires, crimp spade male and
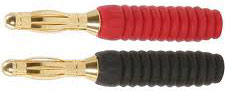
female terminal contacts and a few banana laboratory contacts to
fabricate your test kit.
 |
 |
 |
Car relay socket |
Crimp contacts |
Banana contacts |
The things above plus maybe a toggle switch
Is what you need to be able to test relays in a convenient and trusty way.
You might also want some alligator clips if you intend to use your car battery as a
power source for your relay testing.
How to hook it up
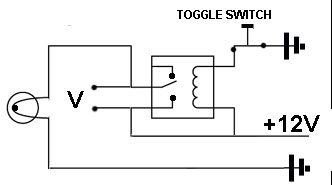 |
The test circuit looks like this. When you close the toggle switch the relay will be activated and the lamp lights up to apply a load on the relay contacts. Now measure the Voltage drop over the relay contacts to check the condition of the relay. The measured value should typically be within a few millivolt (mV) choose a lamp that puts a load on the relay that is close to the current that the in car circuit is using or a load that is close to the relay rating, use ohms law to calculate it :0) |
If the voltage drop is larger and even reaches in to the +1 Voltage range then you can be sure that the relay is due for replacement. If in any doubt, compare with a brand new relay or a relay that you know works well.
If you want to goo even further it is also possible to make a brake out relay test adapter, then you need a scraped relay that you use as a contact interface to the car.
To do this I use the same relay socket as above and on each wire of the relay socket I crimp a male crimp contact as above.
Then I take an old relay and rip out all the internal parts, I then solder a short wire to all the contacts of the relay body and crimp some female terminals to that one.
Now you have a brake out wire set that will make it possible to do the same measurements that I showed you above but now in the actual circuit where the relay normally operates!
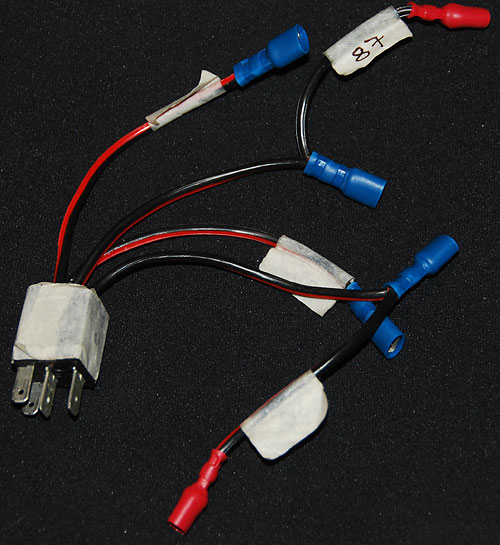 |
If you don't have or can get a relay socket and or broken relay it is also possible to use some wire and crimp terminals to do the same thing. However it will not be as tidy and it will require more care when you hook it up for test. To the left, my brake out wire harness for testing half size (Micro F) relays. This one was used for troubleshooting the magnetic clutch for the HEVAC A/C compressor. With a harness like this you will also be able to diagnose the coil circuit. |
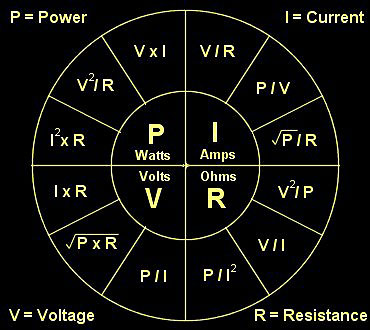 |
Many of us are familiar with mr Ohm but still have hard time to remember how to calculate it. The table to the left can give you some help to remember :0) There is also lot's of online Ohm's law calculators on the web. This is one: ohmslawcalculator.com |
Now you have a very useful test set that doesn't cost you a fortune!
More
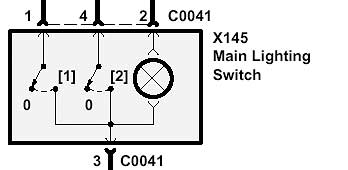
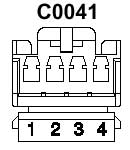
Range Rover P38 Light switch refurbishing/repair of Intermittent function/contact problem.
Initial evaluation of switch problem.
|
|
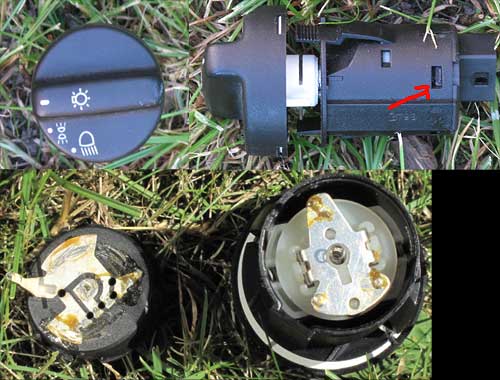 |
Switch removed from dash panel. Red arrow pints at one of the 4 small tabs that holds the switch together. Carefully depress the tabs and pry the switch back off. Be careful and pull the back straight off without twisting or to much jiggling since this will brake the protruding contact brush. |
Now you have the switch i two parts and you will be able to clean the
contact surfaces that might suffer from oxidation.
Use a fine abrasive paper or just the tip of a small screwdriver
to gently remove the oxide.
The Brow/Yellow grease should stay on the contact surfaces it's there
to prevent oxide to build up.
And even more will come :0)
Free hosting & domain name. 1000MB and .com or .co.uk domain free for 1 year.
Limited time only. Check www.one.com for more details