logo

Epson Perfection V850 Pro the review

The Epson Perfection V850 Pro (AKA GT-X980 in Japan) review is now on and will be updated continuously and will run like a blog until further notice.

Questions and requests can be asked in the comment field at the bottom of this page and I will try to obey and respond to as many requests as I can manage.

The review is LIVE updated (Latest update 18 FEB 2015 Film holder mod) so material already posted might change during the progress and possible discoveries of the review.

Some data for the Epson Perfection V850 Pro

  • Dual lens system: Swaps between 6400ppi for slides and film, and 4800ppi for photos
  • High productivity: One second warm up time and two sets of film holders

Don't expect any boring "Unboxing" in this review I will go straight to the
"I want to know" stuff

V850 Pro film height adjustment

To the left: One of the great improvements of the Epson V800 and 850 Pro is the new film holders. They have been re-designed to provide easy and fast height adjustment to make small corrections to achieve the best possible focus faster and more accurate than the before.


The height of the V800/V850 Pro new film holders can be adjusted in five (5) indexed steps in which they snap to. However for fine adjustment the can also be put in any position between the steps.

V700 Film height adjustment

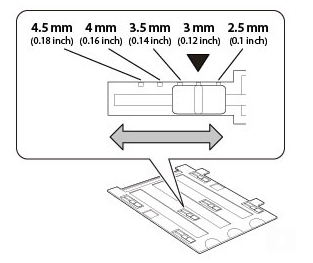
The Epson V700/ V750 film holder height adjustment is a bit coarse and involves fiddling with small plastic feets that can be used to get 3 different heights. This doesn't give you the best options since the optimal focus might be in between two of those settings (As in my case with 35mm framed slides).
  
Epson Perfection V850 and the new better film holders

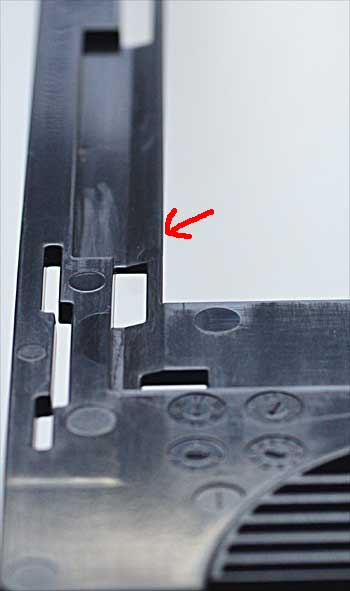
This is a closeup of the Epson V850 Pro film holder for framed slides.

This holder is identical to the one supplied with the V700/V750. Exept for the fact that the V850 film holder is much more rigid due to the thicker plastic mold "Red circle". And the added ridges in the structure.

Q - Did it work with the V700/V750?
A - YES it works just fine!

The strip film holder that is delivered with the Epson Perfection v850 Pro

The film strip holder that is delivered with the Epson Perfection v850 Pro is a total different unit than the dinky one that came with it's precursor.

The new holder is way better in most respects. One improvement is the anti newton (AN) inserts that helps to keep the film flat.

A new design of hinges in the frame that keep the film in place is another step forward and are nicer to operate (Still feels a bit fragile thought).

The strip film holder is also equipped with two extra height adjustments between the strip openings for added support and improved precision.

Only drawback that i can find is the 3 vs 4 strip capability, however this is a small issue on a otherwise nice improvement.

Productivity can still be pushed with a 2nd set of film holders (Included with the V850 pro but optional for the V800) and the fact that the new holders is easier to load.

All other supplied holders the MF 120 film holder (Up to 6x20cm) and the 5x4 inch film holder have the same AN insert.

They also have the same kind of improvements but also the same drawback in less batch scan capacity 120 and 4x5" film one vs two strips/frames.

Update: Further investigation of the new film holders have revealed some design flaws in the MF film holder (or maybe is it just a bad sample I will check with Epson).

Update/Corrections 2: Some readers have alerted me about placing the film in the wrong way this is also what Epson asumes and they will send me a revised illustration of how to use the MF film holder. I have also used the wrong word before (calling the chamferd AN insert holders guides) this might have confused some, this is now corrected

Update/Corrections 3: Epson have now updated the FAQ to include a clarification of how to insert film in to the medium format film holder This is a link to that FAQ. And a link to the part of this page explaining the same thing and the problem it cause!

Update/note 4: Found that the 4x5" sheet film holder share the same design flaw as the MF film holder, not even the supplied 4x5 IT8 target fits the way I like it to do! However in the Epson manual for the 4x5 film holder I also found this text "Note: You may need to trim the edges of the film so that it sits properly in the film holder without bending or warping. Do not cover any of the small holes in the holder."

Update 5: How to tweak the MF 120 film holder to improve the user experience and film handling. this is an easy modification that most people can perform with a minor DIY skill and just a few simple tools. This mod will overcome most of the problems I have been complaining about [Take me there].

Update/related stuff 6: A review of the high quality 120 film-holder from betterscanning.com [HERE].

The MF film holders with AN insert

Epson Perfection V850 pro Medium format film holder with AN glass. Epson V850 pro 120 film holder.
   
Image above: shows that the AN insert
equipped MF film holder for the
Epson V850 Pro is to narrow to be used with 120 slide film. It only measure 59mm between chamfered edge AN insert holders! (Film placed this way to highlight the problem). Read further to find out how the film should be inserted.

In this image I managed to pinch the film under the tabs that are holding the AN insert in the holder, I couldn't do that without ruining my film sample ;-(

This isn't the way you should place the film either.

Epson V850 6x17 film in AN glass holder Epson Perfection V700 MF filmholders for reference.

If you try to fit the film in accordance with
the Epson manual the way it feels natrual you will end up with this result!

This isn't the way you should place the film either. But I would have prefered this to be the case!

Above: The MF film holder Epson V700 have the correct width 62mm between guide tabs. Which also the V850 holder has read more below.


NEW:This is how you should place the film in the MF film holder

Film should be placed between the small tabs that the red arrows are pointing at which is the guide tabs that are suppose to be used. When you do that you end up having the film resting on top of the chamfered edge AN insert holders as stated before(green arrows). That way the film will not rest against the AN insert.

However when you close the clamp down the frame you will see that the frame it self has a mating concave chamfer that suppose to force down the film. The frame will lock down in the small tabs shown with white arrows. This works good in theory but in practice the film is stiff enough to force itself away from the ANinsert at the edges and end up to be less then perfectly in focus.


Above: The frame that snaps down and locks the film in place. The red arrow points at the concave chamfer that suppose to force the film down against the AN insert.

And the image above is what I'm whining about! this image clearly shows the issue!


NOTE: If I insert the film in the proper way and then gently tap the film with my finger I can also clearly see that the film is hovering above the AN insert for the main part of the area.

You may think that I am picky but keep in mind just a few tenth of a millimeter will also compromise the sharpness of the scan in film-holder mode due to the shallow depth of field of the "super high resolution lens".

This is also why some reviewers of the previous model V750 found that wet mounting the film straight on the scanner glass and using film area guide mode to produce sharper scans than it does used with the film in a film holder scanning in film holder mode which uses the high resolution lens! (Yes this is confusing and Epson have not been clear enough in their explanations).


The above video clearifys my point.


The problem with with of the MF space can of cource be solved by trimming the film length-wise or by doing a DIY trim of the guides in the film holder. But this is not what you expect to be necessary on a brand new scanner of this class do you!

The 120 film used is Fuji Velvia RPV100F which I measured to 61mm wide and is following the ISO 732:2000 standard for medium format film. The link below takes you to the MF film wiki page.
"The 120 film format is a roll film which is nominally 60 mm wide (in fact, about 61 mm, or 2.4 inches)."

I have sent a question to Epson about this issue and will report back when I get an answer, it is now the 22nd Jan 2015 and still no reasonable answer from Epson on why they not designed the 120 holder the same way they did with the 35mm film holder that works fine!


The 4x5" filmholders

I have not found any issues with the film holders for 4x5" sheet film holders.
Sheet film is generally quite flat and doesn't cause any problems, it stays flat against the AN insert and is held securely by the clamp frame.

The 35mm AN insert film strip holder

Epson Perfection V850 pro film holder with (AN) anti newton glass inserts.

Image above: 35mm filmstrip holder for Epson V850pro does have the correct measurements and the film fits perfect on the AN insert why didn't Epson design the MF film holder the same way as this one?

The only issue is that if you put the film in accordance with the manual (Shiny side up, which actually is down when you put it on the scanner!) is will not be held flat.

Take a look at the reflections that the ruler projects on the film to get a sense of how flat it stays in the holder in with film put in different ways.

The solution is to put the film with emulsion (flat/dull/not shiny) side up and let the shiny side rest against the AN insert, now it stays in contact with the insert surface and will stay flat and nice in the holder. (Later in this review I will examine the difference between scanning emulsion side up or down.)

If you are scanning the film this way you also have to flip the image either in the scanning software directly if possible or in your favorite image editor.

Movable dividers like the T-locks used by Betterscanning.com is another aid to hold the film flat that would have been nice to have and which also might have made it possible to put the film shiny side up.


Improvised T-lock made of a matchstick

Image above: A test with an improvised T-lock made from
A matchstick to keep the film flat.

Later in this review I will examine the difference between scanning emulsion side up or down.


Q - Did the V850 filmstrip holder work with the Epson V700/V750 scanner?
A - YES!

Q - Can the new Epson film holder be bought separately or as a spare part?
A - Yes both separately and in kit with all holders as delivered with the scanner.

Epson user replacable parts for Epson V800/V850

Part# 1638269 film holder 4x5 about $15  
Part# 1638271 film strip holder 35mm about $58  
Part# 1638268 film holder 35mm slides about $11
Part# 1638270 film holder 120film about $26 (Warning read about this holder on this page).
Part# B12B818272 FLUID MOUNT KIT FOR PERFECTION V800 AND V850

Buy them at Amazon.com when available: click HERE!

The actual testing with samples and detailsl


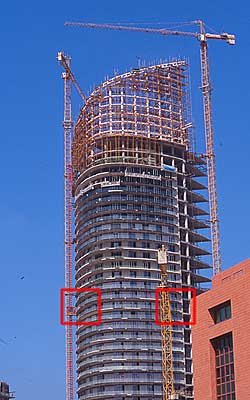
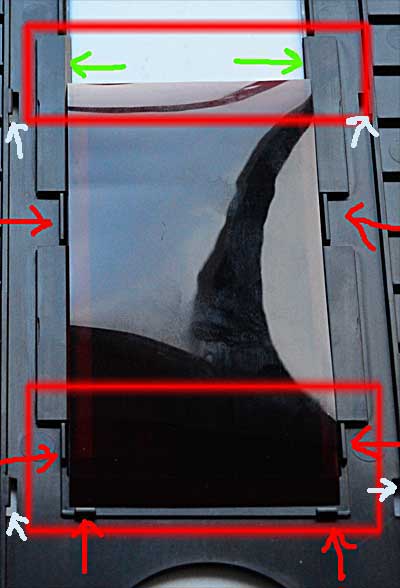
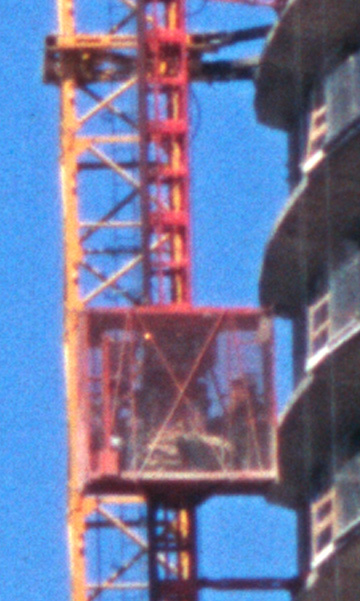
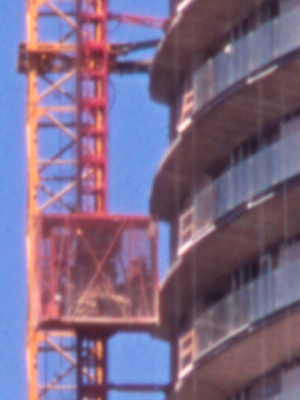
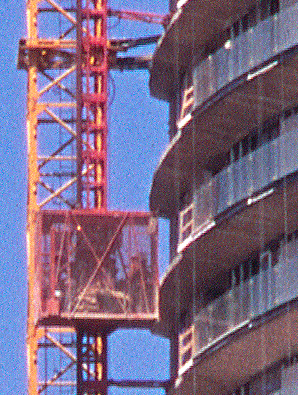
To the left: My abused scanner test slide.
It is a Fuji Provia 100 framed slide and the photo was taken in Beirut in September 2005 with a sharp lens and a Nikon F100 on tripod the weather was bluebird as you can see with speedy shutter time so no blur due to vibrations part from mirror slap.

Red squares indicates crop positions for pixel peeping ;-)

I will mostly focus on the left hand crop of the construction elevator basket with "Bob the builder" inside!

First part will be about resolution and how to get the sharpest possible scan from the Epson V850 Pro.

2nd Part will be about color.

3rd Part will be about scanning software, Epson Scan and 3rd part software like Vuescan and silverfast.

4th Part will be the "Compared to part".

5th Part will be the usual Pros/Cons and conclusion.


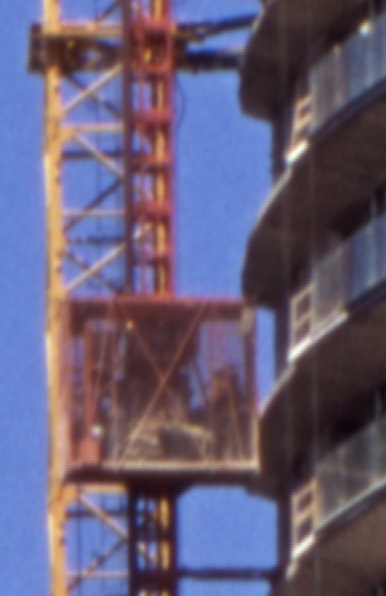
After about five hours and a mix of trial and error plus a large dose of tiring pixel peeping I have come to the conclusion that with my 1.5mm framed slide shot the height adjustment should be at its lowest level (closest to the glass) if I would have used the factory options.

After further fine tuning i ended up using one layer of electrical tape as a spacer between the height adjustment feet's and the glass at the lowest setting to achieve the best possible sharpness from the Epson Perfection V850 Pro.

This is not a setting I recommended since the optimum height may be different on your scanner due to manufacture tolerances!

During this initial "Sharpness evaluation" I have used Epson scan and turned off all image improvement options like sharpening, dust removal and color fidelity adjustments.

Scanned With Epson scan - 48bit TIF @ 6400ppi to be sure to use the high res lens The full image size is 5700x8750px .

The first crop is untampered except for save to JPG HIGH (10) so this is the sharpest I could get straight from the V850 pro.

Crop size 386x596px


Download the crop to the left as a 15mb 48bit TIF [DOWNLOAD IT HERE] to play with it yourself!

Download i1 Scanner freshly made custom profile for the image HERE. This make it possible to get the colors right. (Assign profile to image in your favorite image editor).


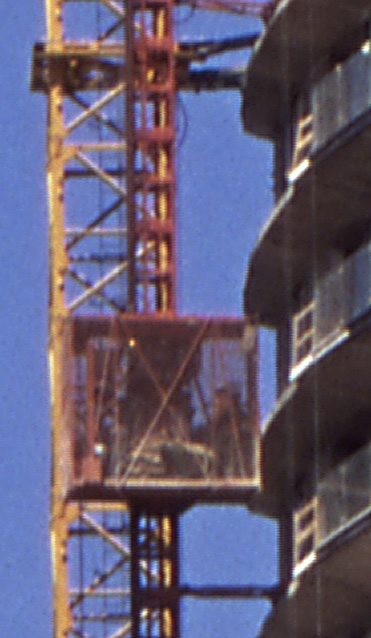
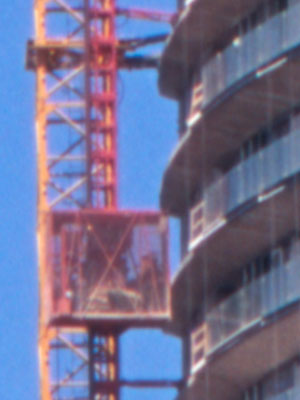
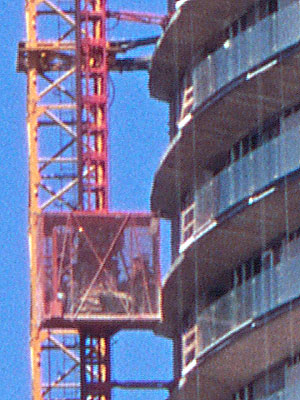
Same crop as above now with some (In fact a bit to much) sharpening and some levels adjustments.

It is most probably possible to squeeze out a bit more in respect of quality if some more work is put in to it, however keep in mind how small this crop is.

And after all this is a scanner review so I will move forward ;-)


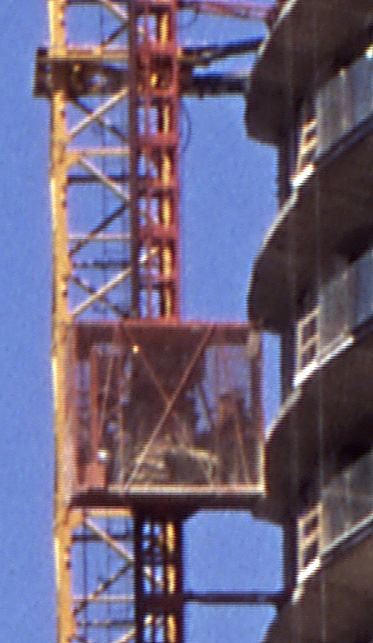
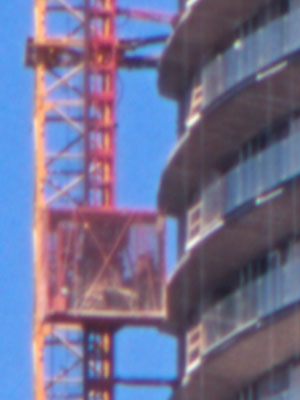
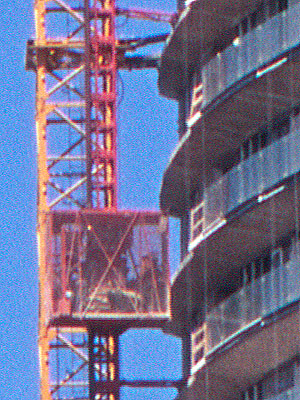
This is a scan from Epson V850 pro @ 48bit 4800ppi made in Epson scan. then up-sampled (Bicubic (Smooth gradients) to 6400 and sharpened.

This proves (At least to me) that the up-sampling is better to be made after the scan has been done than within the scanner software.

The optical resolution is clearly not 6400ppi!

The up-sampled 4800 scan is smoother and in fact appears to be sharper as-well!

Look at the white edge of the balconies and you will see more sawtooth pattern in the 6400 scan above.

This scan actually looks really good even compared to the unsharped Canon FS4000US scan below!


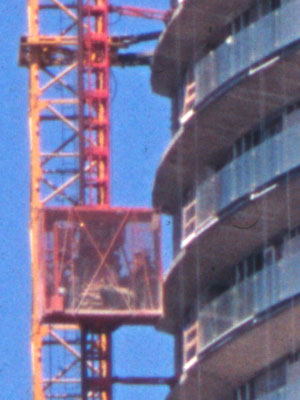
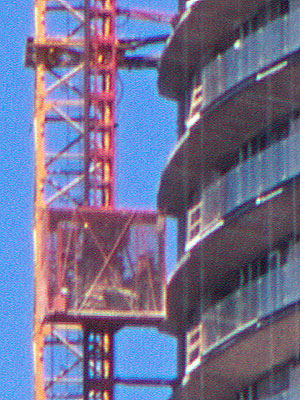
A quick quality indicator.

To the left a scan from my old trusty Canon FS4000US which is a dedicated 35mm film scanner.

This crop is taken from a scan at full resolution (4000ppi) and then up-sampled to 6400ppi to make a "fair" comparison ev thought the colors doesn't mach at all.

Vuescan is thre scanning software that has been used with the Canon FS4000US

No Sharpening applied!

More Epson V850 Pro vs Others later in the review.


I will now stop trying to get the scanner to perform fantasy resolutions.
It is time to get realistic and start to see how good the V850 Pro really is it within its limitations.


From now on I will try to keep the colors as constant as possible. Consistent colors is the key to make it easier for you to compare the different crops.

I have used 3 competing scanners (Canon FS4000us Epson V850 pro and V700).
All to make it more easy to do a proper evaluation of the V850.

All scans have been performed with a custom profile made with Xrite i1 Scanner and with the film holder at the best possible height.

Epson scans have been performed at 4800ppi and are then downsampled to 4000ppi (My laborations have showed me that there is no reason to scan at higher resolution than that).

I have made and examined about 20 scans on each of the scanners to find out! All to be sure that this is the best I can get.

The best straight scan I could get from the Epson Perfection V850 Pro (No sharpening applied).

The best straight scan I could get from the Epson Perfection V700 (No sharpening applied).

This is a V700 scan with the film wet mounted directly on the glass bed and scanned in film area mode (Using the low res lens).

Just because some say this is the best way to get the best out of the V700.

In my eyes it clearly isn't


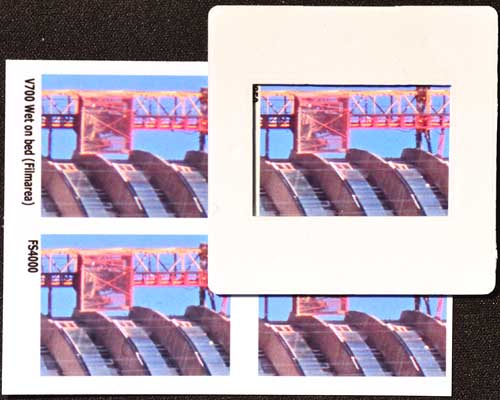
The good old Canon FS4000US (Dedicated 35mm film scanner). At its native 4000ppi resolution and no sharpening at all applied.
Update! The best straight scan I could get from the Epson Perfection V850 Pro using the Fluid mount tray (No sharpening applied).
 

Now I will show you the same images again.
This time with what I belive is a suitable amount of sharpening (USM Settings below the images).

The V850 Pro with the 3X sharpening. Look at the sky and the details, they appear to be smoother than the V700.

I have used the same sharpening settings with this crop as I have been using for the V700's. I tried but it didn't get any better with further sharpening it just started to look ugly.

A scan with the V700 using a V850 slide film holder. This is the best I could get from the V700 and it is in fact not bad at all.
The V700 wet scan is the softest scan of this quartet of images. However it is still quite good and has less artifacts than the others (Except the FS4000 scan)
The FS4000US with Sharpening. The settings was * A300 R0.7 T0 and just once.


*Sharpening settings is for PS and A= Amount R=Radius T= Threshold

Note: The V850 and V700 scans were sharpened in three steps as follows.

  1. A400 R1.0 T1
  2. A300 R0,3 T1
  3. A500 R0,2 T0
Update! The V850 Pro with the 3X sharpening. This time I have used the Epson fluid mount tray to wet mount the film. In this case I should have been using a bit less sharpening. Surprisingly it looks like the scan is much sharper and that the film grain now become visible! More about the EPSON fluid mount kit HERE!


I'm not sure but It might be the new LED light source that helps to make the skies smoother and even surfaces less noisy. Other than that it's a close call between the two Epson scanners in battle, the new Epson Perfection V850 Pro and the Epson Perfection V700 Photo.

There is an amount of difference but is it this really enough to be spotted in a print?

Well to find out I sent the crops above to my local print lab to get printed with a Lambda 400 printer. Below you can see the result as I scanned the print at 600ppi on the Epson V850 Pro in reflective photo mode no sharpening applied on the reflective scan.

Then the image is down-sampled and saved at 300ppi to match the sizes of the crops above. This is still an enlargement on your screen relative to the physical size of the printed image.

The physical print size of each crop is only 24x43mm when printed at 300ppi have that in mind when you look at the images.

The section printed below comes from a section of a the 35mm film that is about 2mm wide and 2.7mm high!


Positive slide film Scanned on a Epson perfection V850 Pro and printed on a Lambda 400 printer.

Above a scan of the Lambda 400 print.

For further pixel peeping her is the 600ppi scan from the print as TIF file [DOWNLOAD HERE]
To print it yourself dowload the file I sent to the lab [HERE]

This image illustrate the size of the 300ppi print from a 4000ppi scan.

The crops is a almost perfectly fit for a standard 35mm slide frame.

The elevator basket is about 10x10mm.

The print size of the full image frame is 300x460mm witch is about a A3 paper size.

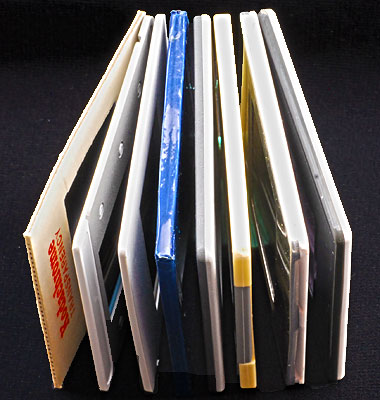
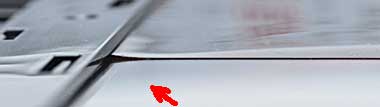
The issue to the left!

Mounted slides come in various thicknesses, this is one of the pit falls.

Make sure to make a record of different height settings and slide frames and don't mix frame types in the same batch scan!

In the sharpness investigation above I used a slide with a frame thickness of 1.5mm.

It is a good idea to pick a selection of sharp images with various thickness, find the optimum height setting and make a record of it for future use. That will save you lot of time in the future scanning sessions.

Epson Perfection V850 Pro vs V800

What is different between the V800 and the V850?
Well same difference that applied when the V700 and V750 was introduced the V850 Pro is said to have improved optics (Additional lens and mirror coating)

The V850 Pro also comes with two sets of film holders, and a special mount adapter that keeps the film completely flat for scanning, it is also bundled with SilverFast SE Plus 8.

(It would have been nicer and more "PRO" if the V850 would have been bundled with SilverFast Ai Studio.)

The Epson Perfection V800 photo comes with the regular SilverFast SE 8.

Also buying the V850 will get you a free fluid mount scanning accessory however not automatically included it is only delivered on request (but for free).

The fluid mount accessory is also optionally available for the V800 Photo at additional cost)

Epson answer about the Dual lens system:

Epson Dual Lens System is a double-lens scanning system that optimizes each scan by automatically selecting which of the two lenses to use for the scan.

Depending on the resolution you've chosen, the lens carriage sets the appropriate lens in place.

The following two scanning modes are available:
Super Resolution Lens Mode enables 6400 ppi scanning of 35mm, 2¼″, and 4″ x 5″ medium format film.

A large diameter lens and higher F-stop optimizes MTF (modulation transfer function), ensuring the highest level of detail and sharpness.

Note: To scan 4″ x 5″ medium format film with Epson Scan, scan in Professional Mode and select Film (with Film Holder) for the Document Type setting.

High Resolution Lens Mode for transparency and reflective 8.5″ scanning in 4800 ppi.

That didn't make me feel sure about anything...

My research at forums and other V700/750 reviews have made me to come to this conclution.

The Super Resolution Lens ("6400ppi") is used as soon as you select Film [With Film Holder]

The High Resolution Lens ("4800ppi") is used in all other modes the including film area guide and reflective mode.

With Vuescan:

The Super Resolution Lens ("6400ppi") is used as soon as you select Transparency

The High Resolution Lens ("4800ppi") is used in all other modes the including Transparency 8x10 and refective mode.

The Super Resolution Lens ("6400ppi") is used as soon as you select Transparent

The High Resolution Lens ("4800ppi") is used in all other modes the including Transparent (full area) and reflective mode.

 
NEXT page Color profiling ->

Comments on the Epson Perfection V850 Pro review here!

Gallery | D.I.Y | Reviews | Shop | Blog | Contact