
This is a ongoing project that may change over time so keep looking back for updates and upgrades.
Latest update 27 Nov 2023
For now lets focus on the drilling spindle
The motor and ECS was chosen on a budget and what I beleive enough power for the task (to be reviewed and judged later). The motor is a 3300Kv 800W motor and the ECS is capable of 60 Amp momentary current, initial test shows that I will never come close to that.
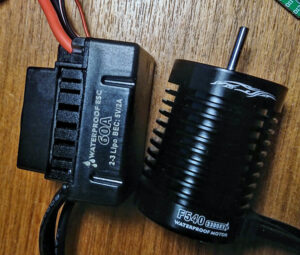
This motor are made for and intended to be used for RC cars 1:10 or smaller. The ECS designed to be controlled by a RC servo receiver and expect to have a 50hz based PWM signal.. so hooking it up to a GRBL board need some tweaking.
The motor has a 1/8″ (3.175mm) shaft wich is perfect for my needs since I can use a simple (but precission made) shaft coupling to attach my drills and V-mill bits with the same size shaft to the motor shaft more on that later on.
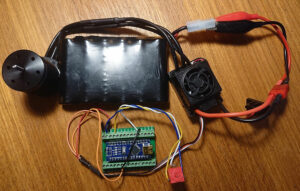 The test rig looks like this and here it is running froma 7.2V accumulator package. When used as a spindle I will feed it with 12-14V DC to get somwhere between 40 and 50K rpm.
The arduino nano uses the position of the potentiometer (voltage on the analog pin) to set the corresponding PWM value on the digital pin for ECS pwm in pin.
Code used for the arduino nano that I for the time beeing are using to get it to spin att my desired speed and start at that speed when powered on is the following. Code is not entirely mine just sligtly modified to start att power on and to exclusivly run clockwice. The code below contains comments that should explain whats going on. Will take a look at that “delay (4000)” part and se if I can cut the delay down a bit.
/*

        Arduino Brushless Motor Control

     by Dejan, howtomechatronics . com

     Modified for PCB drilling spindle use by stockholmviews . com

*/

#include <Servo.h>

Servo ESC;     // create servo object to control the ESC

int potValue;  // value from the analog pin

void setup() {

  // Attach the ESC on pin 9

  ESC.attach(3,1000,2000); // (pin, min pulse width, max pulse width in microseconds)

  digitalWrite(2, HIGH); // Zero the ECS  (Digital pin 2 connected to Analog pin 1 (A1))

  delay(4000); // delay to allow the ESC to recognize the stopped signal

  digitalWrite(2, LOW); // Zero done and motor starts at Potentiometer preset speed (Swiper on pin A1 pot value used 20K)

}

void loop() {

  potValue = analogRead(A1);   // reads the value of the potentiometer (value between 0 and 1023)

  potValue = map(potValue, 0, 1023, 90, 180);   // scale it to use it with the servo library (value between 0 and 180, i choose 90 to 180 for clocwise only spindle)

  ESC.write(potValue);    // Send the signal to the ESC

}